Apparently You Should Have Salt Lamps In Each Room Of Your House. This Is The Surprising Reason Why!

image via – youtube.com
Millions of years ago the Indian landmass collided with Asia and formed the Himalayan Mountains, which have been growing ever since. The immense range is where 9 of the world’s highest peaks are found, one of which boasts the highest elevation on Earth, Mount Everest.
Over a thousand miles away from Everest, in northern Pakistan, lies the foothills of the Salt Range. A shallow sea located there evaporated long ago, leaving behind tons of crystallized sea salt that’s buried deep below the mineral rich mountains. This is where most of the Himalayan pink sea salt is found and mined.
The salt mines have been open and active for hundreds of years, but the immense health benefits of Himalayan salt have only recently been widely recognized. The natural underground formation of the beds led to over 84 trace minerals being added to the salt including calcium, copper, sulfates, zinc, magnesium, iron and more, making it the most mineral dense type of salt in the world.
There are a number of excellent health benefits that Himalayan salt offers and you need not eat it to get all of them. Lamps made from the salt can do wonders for your health and home thanks to their natural air cleaning ability.
The salt lamps generate and give off negative ions which are oxygen ions that have an extra electron attached to them. They are found in nature near rivers, waterfalls, and other bodies of fresh flowing water. It’s believed that when we breathe them in they react with our bodies and produce positive effects.
When people report feeling happier, clearer, and more refreshed around these water sources, it’s generally attributed to the negative ions they are taking in. Think about and imagine the fresh air that comes after a thunderstorm, that air feels so good because it contains vast amounts of negative ions.
Another effect that negative ions have on our surroundings is that they can bond together with positive ions and thus neutralize them. Positive ions do not have a positive effect on our bodies. They are what TVs, microwaves, and other electronic devices create and put off and can be harmful to us.
Some people are affected more than others and may experience headaches, stress, allergies, and sleep issues from them. Placing a salt lamp in your home greatly reduces the presence of positive ions in the air, while simultaneously increasing the amount of negative ions.
Thus, they cut down on the harmful silent effects electronics have on us, which are often overlooked. The lamps are an easy way to make your environment and the air you breathe cleaner.
The following health benefits are what people report experiencing soon after using salt lamps, they include help with:
1. skin conditions
2. headaches, migraines
3. stress and stress-related disorders
4. insomnia
5. allergies and sinus issues
6. arthritis and rheumatism
7. respiratory problems and asthma
8. colds
9. increased circulation
The lamps leave your mind, body, and health all better off and all you have to do is switch a light on. To truly harness the healing power of salt lamps they should be placed all throughout the home and especially near electronic devices.
While one single lamp will have a positive effect, it won’t be strong enough to impact your health, so make sure to use several. Also, eating pink Himalayan sea salt is even more beneficial to your body than regular table salt, but that’s a whole other story.
Check out the video for more information and try out a few Himalayan salt lamps if you haven’t already done so yet! Do you already have one of these? Will you be getting one? Let us know!
Please Share This With Your Family and Friends
He Places A Sock Filled With Salt On A Pan Heats It Then Puts It On His Ear. THIS Is The Reason Why!
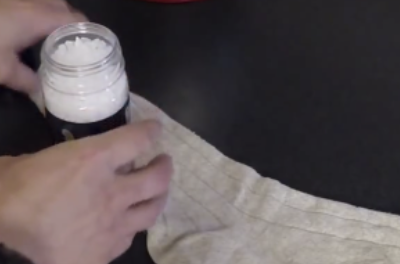
image via – youtube.com
Ear infections can wreak havoc on our health and wellness. They often end up creating terrible and debilitating pain that for some people is chronic and lasts days without end. Children in particular are prone to developing them and it’s heartbreaking having to see your child suffer through the throbbing aches and pains.
Instead of enduring an earache or visiting the doctor, try this age old self-healing trick. It’s called “the magic salt sock” and all you needs is a clean, plain, all white, cotton sock and about 1½ cups of coarse sea salt. Pour the sea salt into the sock before tying it up and closing it off with a knot.
It’s vital that you use these exact two “ingredients” since no alternative versions of them will be nearly as effective. If you fail to use a plain cotton sock that is completely all white, and instead go with one that has even just a colored line on it, you’ll likely end up melting or even burning it.
There is something in the coloring which makes them highly flammable, so be aware and use caution. The sea salt also matters because of the larger sized, more coarse granules it comes in and its ability to retain heat. Regular old table salt won’t work and will just seep out of the sock, so don’t substitute it in place of the sea salt!
The next step is to warm up a skillet over medium-low heat before placing the salt sock in the pan. Allow it to heat up for about 4-6 minutes and every minute or so flip it over and shake it up so that it heats evenly all the way through. You’ll know the sock is done when it’s very warm to the touch, but not so hot that it might burn you.
Finally, all you have left to do is place the heated sock over your aching ear, making sure that it also rests on the area behind your jaw. Sit back and relax as the salt works to alleviate the aches and pains, while simultaneously helping to draw out any toxins in the ear. It’s that simple!
This is one of the best ways to naturally and effectively decrease any discomfort or inflammation in the ear that’s causing you pain. In addition to its natural healing properties, warm sea salt is also antiseptic and can draw out any moisture that may be in the ear.
Furthermore, the magical salt sock can be reused many times safely and effectively, but it will eventually discolor and you should replace it when it becomes worn, dirty, or old. Putting a cup or two of sea salt in a sock, warming it up on the stove, and placing it over your ear may be just the thing your body needs to feel better.
It’s cheap, all natural, and can be done in the comfort of your own home. Many people have found soothing comfort and relief with this simple remedy and if you ever have an ear ache or pains, give it a try and see if it works. Pass this information on to your friends and family, they may find it extremely useful and beneficial as well!
Let us know if you tried out this life hack! Enjoy the video and tutorial below!
Please Share This With Your Family and Friends
I Was Confused When He Poured A Full Glass Of Salt Down The Drain. But The Reason Is BRILLIANT!
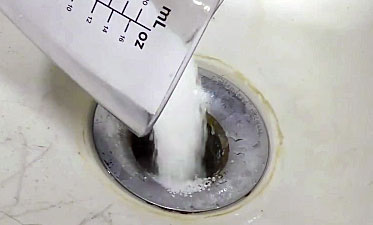
image via – youtube.com
Salt is a common mineral which can be found all over the Earth. It can also be found in practically every kitchen and household in the world and it’s a mainstay we use to flavor and preserve foods. However, there are lots of different uses for salt that extend far beyond seasoning dishes.
This video covers some of the most helpful salt hacks out there, be sure to check it out because somewhere down the line these will likely come in handy! If you ever find that your iron has something sticky, gooey, and gross melted onto the bottom of it, try this simple trick to clean it off.
Set the iron to hot, grab a sheet of wax paper and sprinkle a layer of salt on top, then rub the iron back and forth across it. The salt picks up the residue and causes it to clump, leaving behind a clean iron. Eggs can be a real pain to clean up and if you ever drop one accidentally simply pour salt over the runny mess and wait 10-15 before cleaning it up.
The salt turns the liquid parts to gel so that when you wipe it up it stays together and doesn’t drip or run all over the place, saving you a lot of paper towels in the process! Another cooking salt hack involves dangerous grease fires which cannot, and should not ever, be put out with water.
Pouring water on a grease fire simply makes it worse and you want to smother the fire, not spread it. One of the best ways to put it out is by pouring salt directly onto the flames, thereby cutting off what’s fueling the fire, oxygen, and extinguishing it immediately.
If you have pots and pans that are all dirty with caked on, burnt crud, salt can help clean them up. Coat the bottom of the pan with a layer of salt, add a little water, wait 10 minutes, then wipe away the mess and rinse it off. In similar fashion, salt can also clean grease and burnt crud off of a dirty sponge.
Place 2 cups of water in a small container, dissolve in ¼ cup of salt, submerge the dirty sponge and allow it to soak overnight. The next day all you have to do is remove the sponge, it should be clean and back to being usable.
One of the hardest areas of the bathroom to clean is the stains on tubs and sinks. This method for cleaning them is a little harsh, but extremely effective. You’ll need a pair of rubber safety gloves and proper ventilation, so open a window and be cautious handling the solution.
Mix together equal parts turpentine and salt, about a cup of each is recommended, then apply the solution and undissolved salt to a sponge and use it to scrub the stains. After about a minute you should begin to notice the spots disappearing and when you’re done the bathroom will be shiny and clean.
While you’re cleaning the tun, if you have a clogged drain, salt can help you clear it up. First, remove as much of the blockage and hair as you can before combining ¼ cup of baking soda with a ¼ cup of salt. Mix it up and pour it down the drain, then pour about a ½ cup of white vinegar down right after, and watch as it fizzles up.
Let this sit for at least 15 minutes while it works to eat away at the clog. Meanwhile, bring a pot of water to a boil and when times up pour it directly down the drain to clear out any remaining clog.
Hope these salt hacks are helpful and of some use to you! Let us know if they worked for you!
Please Share These Salt Hacks With Your Family and Friends 🙂
She Starts Cutting Off The Top Of This Salt Shaker. But When She’s Done It’s Surprisingly Brilliant!
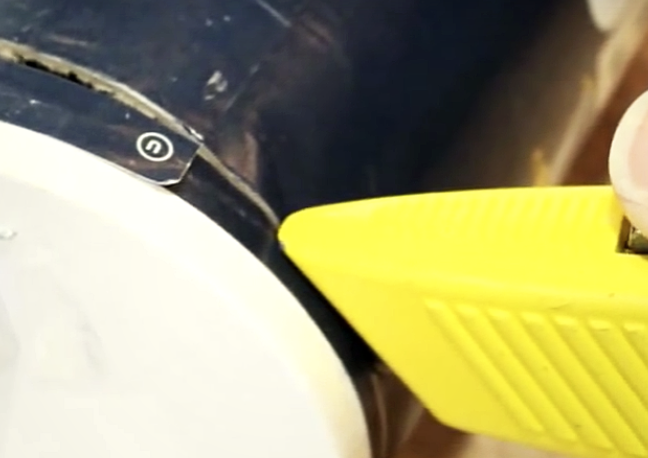
image via – youtube.com
The mason jar phenomenon has taken a firm hold in society and the handy glass jars are no longer only used for their original intended purpose, canning food. These days people use them for just about anything and everything one can imagine. Odds are you have a few in your own home and if not they are quite inexpensive and widely available at many stores.
Beyond storing foods and other items, they also make handy drinking glasses, neat soap dispensers, candle holders, lanterns, and more. Here is an additional way to get the most use out of any spare mason jars you may have sitting around. In this short video YouTube channel ThriftyFun shows how to make a simple and convenient easy pour top for a mason jar.
All you need is a salt container with a pour spout, a knife, and a mason jar with a ring that fits onto it. Start by carefully cutting the top off of the salt container. Flip it upside down and place the top of the mason jar on it, then trace around the rim opening with a pencil. Cut the traced circle out and then place it on top of the jar as you would with a lid.
Screw it on securely with the jar ring and check to make sure that it fits, trimming it if necessary. That’s all it takes and now you can fill up the jar with whatever you want. When it comes time to pour stuff out the modified top makes it much easier to measure and control, it won’t dump out all over the place. This works great for dry, messy, powdery things such as glitter and beads or other small craft items.
It also comes in handy in the kitchen and is perfect for storing seasonings, rice, sugar, flour, and of course salt!
Please SHARE This With Family and Friends
Whenever She Goes To Her Yard To Garden She Brings Epsom Salt. The Reason Is Brilliant.
Epsom salt is actually magnesium sulfate, which has been known to have the ability to act as a fertilizer, when mixed into the soil of plants, flowers and trees. This allows the plant to put out more healthy growth!
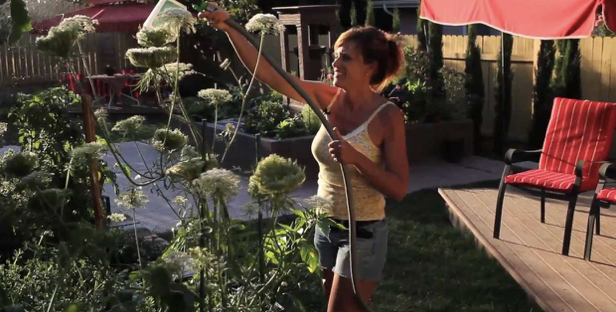
The video you are about to watch below, provides a tutorial in using Epsom salt MORE DIRECTLY on your flowering and non-flowering plants and trees, as well as on bushes and vines that produce fruit and vegetables. By creating a mixture that you attach to your hose, you will see your garden become MORE LUSH IN LESS TIME. She will explain how doing this enables all of your garden, including your lawn, to receive more chlorophyll which converts into energy.
Your fruits and vegetables will be sweeter, leaves and lawn will be greener, and rose bushes (which are finicky), will produce larger blooms. Potted plants, usually more deficient in magnesium than those planted in the ground, will greatly benefit from adding 2 tbsp of Epsom salt into the soil once monthly. Then spraying the actual leaves and blooms as you will see demonstrated, will keep your potted plants blooming all summer.
Please SHARE This Gardening Tip With Family and Friends 🙂
She Rubs Epsom Salt All Over Her Hair. But When She’s Done STUNNING!
Summer hair is best worn loose and natural, you want a style that’s easy to manage and pull off. When the weather gets hot, cool beachy waves are the go-to look for many of us. Nothing looks as pretty and summery as beautiful wavy hair does. The style is perfect for every type of event or occasion you may find yourself at and it transitions seamlessly from day to night. With soft, tousled waves you’ll look great whether you’re at the beach or a fancy wedding!
While a lucky few were blessed with naturally wavy hair that doesn’t require any styling, the rest of us weren’t, and this simple beauty trick is for those who need the help! The key to attaining bouncy beautiful waves lies in a simple sea salt hair spray. Many stores and salons sell name brand versions of the basic spray, but why buy it at a drastically marked up premium when you can make it yourself at home for a fraction of the cost?
The girls in this AwesomenessTV video show you how to create your own sea salt hair spray that’s guaranteed to work because they tested it out as well on their hair model. You only need a spray bottle, hot water, hair gel, and Epsom salt, nothing more, nothing less. It’s essential that you use only Epsom salt for this and not pink Himalayan, Celtic, table, or any other type of salt, because they are not nearly as effective. Epsom salt will add body to the waves without building up or harming your scalp, so don’t skip it!
Check out the video for approximate measurements and the correct combinations, then try mixing up a bottle of it yourself at home. You can look and smell like you’ve spent the day at the beach even if you never left your couch!
Please SHARE This With Family and Friends 🙂