Many people love decorating their houses and making it as cozy and comfortable as can be. Interior design is hugely popular and many retail stores are dedicated to the art of interior decorating. They offer everything from rugs, mugs, and vases to the kitchen sink.
However, many of the items found in stores are expensive and only available in limited styles. This is especially true when it comes to window coverings and blinds. While the options run from basic to fancy, the cost increases exponentially as you move up from mini blinds to silk curtains or cedar paneled shades.
If you want gorgeous, custom made window coverings it’s going to cost you, unless you make them yourself! The folks at Better Homes and Gardens made this easy to follow tutorial on how to turn basic mini blinds into beautiful roman shades.
It’s a much more affordable alternative to ordering custom ones and all it requires is a few things that you likely already have on hand. Those items are; white faux wood blinds, thick upholstery fabric, mod podge and a small container for it, a foam brush, pencil, scissors, clothespins, tape measure, and an iron.
Measure how long the blinds need to be before you begin, then lay them on a flat surface facing down. Extend them out to the desired length and cut away the string that connects all of the slats, aka the ladder string, on both sides. Be very careful to avoid cutting the single, thicker cord that moves the shades up and down, because you’re going to need it.
Each slat is going to be 7 inches apart, to figure out how many slats you’ll need simply take the length of the window in inches and divide it by 7, then snap off any extra slats you don’t need. Next, take the fabric and lay it on a flat surface, place the blinds atop it and evenly space out the remaining slats.
Use the tape measure to ensure that they’re approximately 7 inches apart, this way the blinds will fold up neat and evenly.Measure the fabric so that it extends 2 inches beyond the edge of the slats and 2 inches beyond the top and bottom as well.
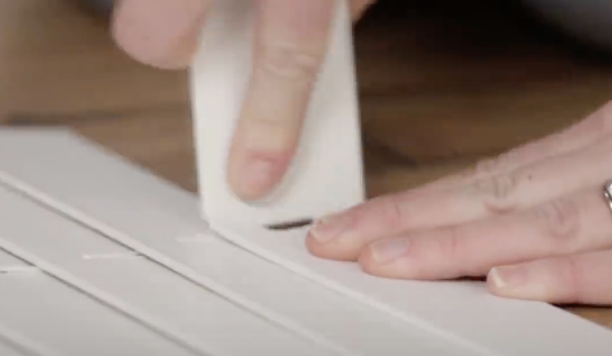
If you need to, iron the edges so that the fabric will form a more even hem. Make sure that the blind operation, the part where the strings come out of the top and extend down from, is placed on the back of the fabric. Remove the stopper, located at the end of the top bracket, and use a pair of scissors to cut a notch in the fabric so that it’ll wrap neatly around that end.
Break out the foam brush and use it to apply a coat of mod podge to both the end of the bracket and the fabric. Wrap the piece of glued fabric around the top of the bracket, press it down firmly and secure it with clothespins while it dries.
Moving down each side, apply glue to the end of each slat and the fabric portion that extends out beyond it, then fold the fabric over and onto the end of the slat and secure with more clothespins. At the bottom of the blinds take the fabric and roll it over so that it forms a clean edge. Brush the bottom bar with mod podge and glue the fabric into place, securing it with clothespins.
Allow the glue to dry completely before removing all the clothespins, and at that point they’re ready to be hung. The shades will still be operational like normal mini blinds, but a lot more appealing and better looking. Plus, things won’t get snagged or hung up in them, (like cat paws!). Best of all, they can be customized to your exact tastes at a fraction of the cost of what you’d end up paying retail.
If you want to give your house or just one room an instant upgrade, try this out!
Please Share This Blinds Hack With Family and Friends