When you bake a cake at home it usually ends up being slathered in frosting and maybe some sprinkles, candy, or fruit gets thrown on top of it. The average home baker simply does not have the knowledge or specialized tools to make fancy cakes.
However, with this simple chocolate tempering decoration technique you can take a boring run of the mill cake and turn it into a work of art! All you need is a piece of clean bubble wrap, pastry chocolate, a microwave, and an already baked cake. Read on to see how you can take a cake from blah to WOW with a little finesse and patience, and be sure to check out the video to see how it’s done.
In a microwave safe bowl break up pastry chocolate into pieces, place it in the microwave, and cook for 1 minute on medium heat. Remove the bowl, stir the chocolate, and resume heating it for an additional minute. Depending on your microwave, you may have to keep heating it in short stages, and you can stop once the chocolate is completely melted and smooth.
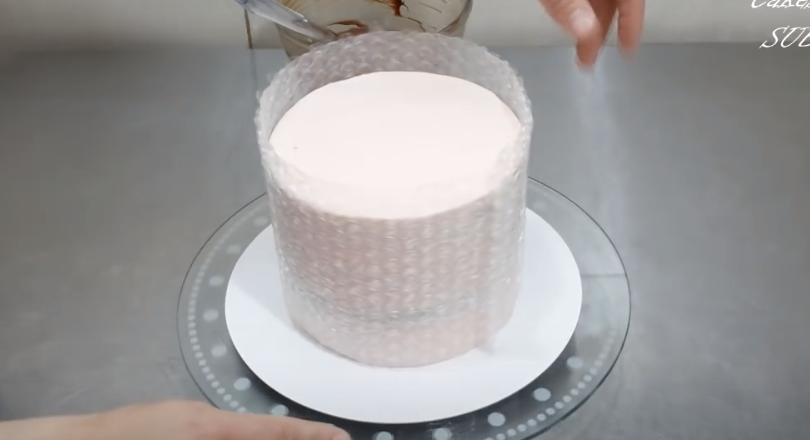
Take a clean, washed piece of bubble wrap that has been fitted to match the size of the cake you’re decorating and wrap it around the cake. Leave about ½ an inch of the edge to overlap where it meets, as well as an inch that extends over the topside of the cake (see video). Lay the bubble wrap flat with the bubble-side facing up and pour the melted chocolate onto it.
Working quickly, smooth the chocolate evenly over the wrap with a flat knife or spatula, covering the piece to the edges as best you can. Allow the chocolate to dry and harden up a bit for about 10 minutes, at room temperature, before you go on to the next step.
Once it’s ready, carefully pick up the chocolate bubble wrap and apply it to the outside of the cake. Make sure the chocolate covered side faces in, touching and resting against the cake, then wrap it around while smoothing it on and pressing firmly against the cake. Pay careful attention to the seam where the edges meet and make sure it’s evenly aligned. Wait about 10 minutes while it sets, then you may remove the wrap.
Starting at the edge that overlaps at the seam begin to slowly peel back the bubble wrap away from the chocolate. Once you get started it should come off easily and you’ll be left with a honey-combed chocolate enveloped cake that looks amazing and super tasty!
The chocolate part that extends over the top edge of the cake makes an excellent holder for any additional topping you may wish to add on, like fruit, candies, cream, or whatever other creative things you come up with.
Please Share this with family and friends