If you are a crafty type of person who enjoys doing all sorts of do-it-yourself things then you likely have a lot of extra craft items on hand, especially glitter. Glitter is the perfect material that adds a little extra flair to practically anything.
It usually doesn’t take much, perhaps even just a pinch will do, to take something from boring to wow with the help of a little sprinkle of glitter. As such, if you have an abundance of different colored and textured glitter on hand you can easily use it up with this awesome glitter bowl project.
It’s a simple and neat craft idea that anyone can do and the perfect way to spend quality time with friends, family, and especially young children. It will get them away from TV and the internet and more involved with creating homemade things.
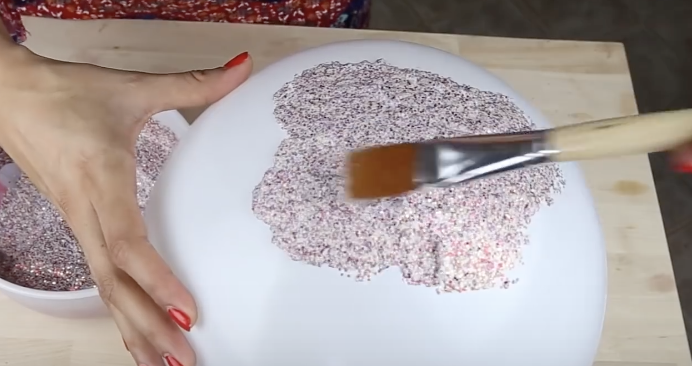
All this project requires is 2 cups of glitter, 1 cup of Mod Podge, a balloon, a paintbrush, and a bowl. Start by mixing up the glitter and Mod Podge together in a bowl so that they are well blended. Blow up the balloon, tie it off, and place it in the bowl with the tie facing down to give it stability and keep it in place.
Paint the glitter mixture onto the balloon surface, making sure to coat it as evenly as possible. Paint half of the balloon to make a bowl shape, or try out different designs. You can customize the bowl, such as by scalloping the edges or making it curve in uneven, distinct ways.
When you have finished painting the balloon set it aside and allow it to completely dry for at least 24 hours. When the time is up you can turn it over, pop the balloon, and remove any of the leftover rubber or latex pieces that may be sticking to the inside of the bowl .
You will be left with a soft, custom made, glittery bowl that is perfect for use as a catch-all. These glitter bowls are not the most durable or strongest bowls but they can hold a variety of little things. You can use them in the bathroom to hold hair ties and clips or whatnot.
They come in handy when placed in a location where things tend to accumulate, such as near the sink or an entrance. They make great holders for knick knacks and spare change as well. Alternatively, you can stretch one of them over an existing, harder bowl to give it a new and updated look.
There are many more ideas and uses for these neat and easy glitter bowls, and maybe you have the perfect use in mind for them. Check out the tutorial to see exactly how it is done and try it yourself!
Please Share This DIY Project With Family and Friends 🙂