
He Draws Over The Flash Of His Phone With A Blue and Purple Sharpie. The Reason Is Unexpectedly GENIUS!
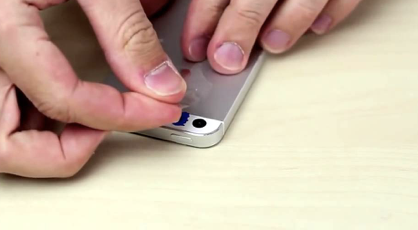
image via – facebook.com
Is there really an app for everything you need in life? Well, there certainly are a lot, which often makes me utter in amazement, “WHAT A WORLD!” However, when I came across this ingenious hack that you are about to watch below, I realized that there are still many apps that haven’t been created, and the idea this clever YouTuber has come up with, serves a really useful function.
Perhaps some of you don’t really care about the nasty viruses and bacteria left on services you touch, but sometimes knowing may save you from picking up germs that will make you sick. Are you intrigued? If you are watch this tutorial below, you will see how easily and quickly, you can turn the flash on your cell phone into a BLACK LIGHT.
Black lights have the capability of making visible, that which you cannot see with the naked eye. All you will need is some scotch tape, one Blue and one Purple Sharpie. The tutorial shows you how easily you can create a black light, that will send you on an exploration of what is actually living on surfaces, that you assume are clean.
This is particularly handy if you are staying in a hotel that appears to be cleaned, but really has surfaces where germs have been left behind by many people who have stayed there before you! Even your own home deserves some inspection…get ready for a good Spring cleaning!
Please SHARE This With Family and Friends
This Guy Takes 2 Sharpies and Colors The Flash On His Smartphone. The Result Will Amaze You!
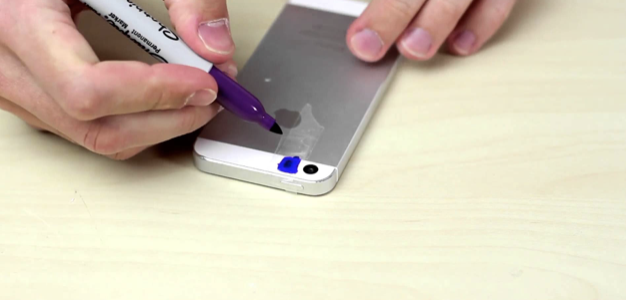
With just two permanent markers, one blue and one purple, and some Scotch tape, you can create a germ finder out of your camera. Simply place the scotch tape over the flash on your phone. Color the light with a blue Sharpie and allow the ink to dry. Layer another piece of tape over the blue and color again with the same marker. After another piece of tape, color with the purple Sharpie, and your black light is ready for use in any completely dark area.
The long wave ultraviolet light emitted by this contraption allows for the observation of fluorescence. The colored glow radiates from many substances when exposed to UV light, and can be used for a plethora of things. Artistic lighting effects, medical diagnosis, detecting fluorescent dyes, identifying counterfeit currency, authentication of paintings, curing plastic resins, attracting insects and hunting rocks are all practical applications of a black light.
The low power UV light is not harmful to the skin or eyes, but powerful UV sources do require protective equipment, such as goggles or gloves. The non-threatening version of UV light can illuminate skin diseases as well as fungal and bacterial infections.
Manufacturers often add fluorescing compounds to poisonous substances to allow it to be detectable by black lights if an individual is poisoned. Different substances glow various colors, and therefore can be identified with the shining of the darkened light. Check out what you can find with your own black light camera!
Please Share With Family and Friends
When You Mix Alcohol With Normal Sharpies The Results Are STUNNING!
If you’re looking for a cool and easy craft idea, or some unique colorful pictures to liven up a space, then check out this video. YouTube channel SoCraftastic uploaded the tutorial which features artwork done primarily with Sharpies, or any permanent marker, and rubbing alcohol. There are 4 different techniques covered and each attains certain results. Each one turns out looking awesome and, best of all, they don’t require that you be a highly skilled fine artist.
The Sharpie watercolor technique is the first covered. Take a sandwich bag and color on it with a marker until there seems to be a lot of ink on the bag. Fill up a dropper with rubbing alcohol and squeeze some onto the marker/bag. Mix it all together with a paintbrush and then you can paint it on canvas as you would with watercolors.
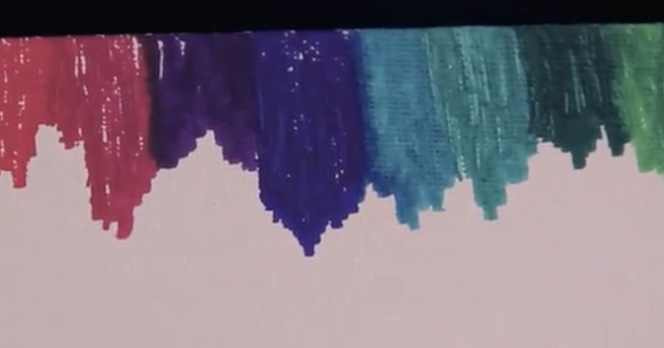
If you add in more rubbing alcohol it gives you lighter hues that are more faint and after about 5 minutes it should be dry. Next is the tie dye technique, which works best with neon colors. Start by drawing a star-burst, then extend it out in layers with different colors until the entire canvas is filled. Take a dropper of alcohol and drip it onto different parts of the canvas. It will spread the ink out and overlap the colors into a nicely blended smear.
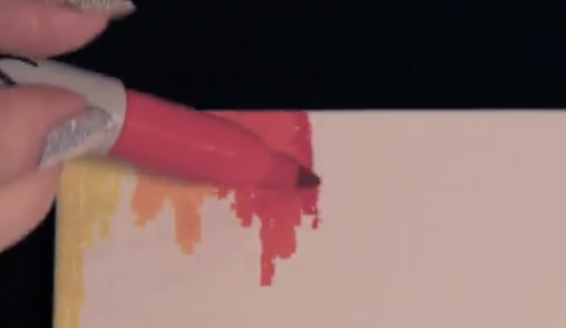
The third is the crayon melting technique, which requires only the top portion of the canvas be colored. Mix up and alternate colors in any way you desire, the video shows rainbow, and you can color over onto the side as well. Prop the canvas upright and drop alcohol onto the top colored portion, making sure to let it run down the canvas as if it melted and dripped down like wax.

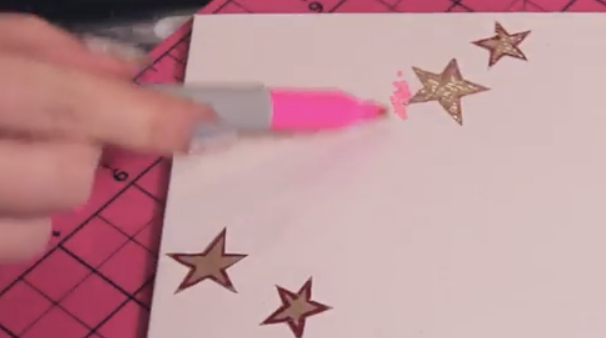
Last up is the galaxy-esque style. Draw stars on duct tape and cut them out (or use stickers) then place them down before you add any ink. Color all over the canvas, with different colors here and there, then add in some black spots. Prop the board upright and drop on alcohol so it runs down. Let it dry and then it’s safe to peel off the stars.
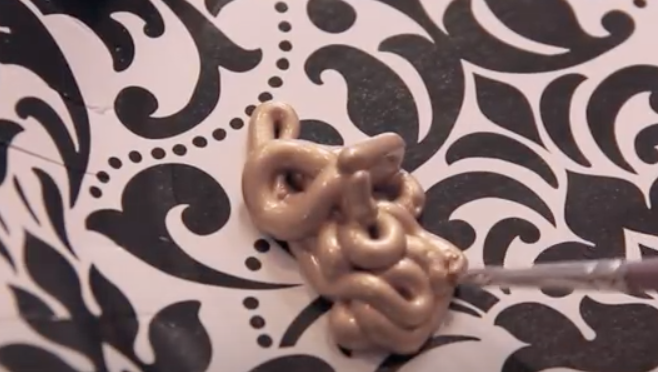
The video girl painted her stars with gold puffy paint, and she brushed on modge podge mixed with glitter, to add a bit of sparkle to the galaxy. These make a really fun project for kids, teens and adults. Plus, with 4 alternative ways everyone can find something to try. Check it out and enjoy!
Please SHARE With Family and Friends


