
The Strange Reason The Blinds Have To Stay Open When Your Plane Takes Off!
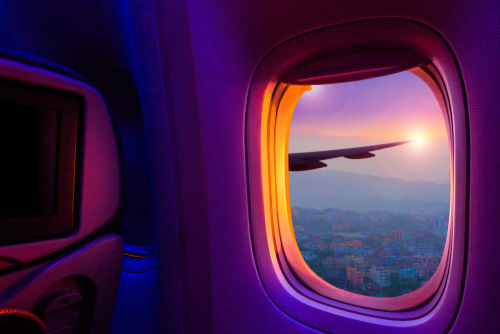
image via – shutterstock.com
Passenger safety is by far the number one priority all across the airline industry. While most of the safety-related precautions and procedures that passengers see and go through happen at the gate and in the terminal, many more less obvious measures are also in place.
For starters, airplanes have to meet some very strict design and construction guidelines in order to comply with federal regulations. These ensure that all sorts of standard safety measures are built right into planes.
When you’re traveling through the sky at hundreds of mile per hour, with a full tank of jet fuel and contending with all sorts of natural hazards, safety and construction are essential. In addition, passengers take on an active role in their own safety when aboard the aircraft.
Everyone knows the drill that happens right before take off. The flight attendants run down the locations of all exits and bathrooms, make sure everyone is buckled in and that all cell phones and electronics are powered off. While the inherent importance of all those things is clear, the reason why we have to have the window blinds open on take off and landing is less than clear.
Even so, we all open them if asked to and there is a good reason behind the safety measure. According to airplane crash statistics, the majority of problems and accidents that occur while flying happen during take off and landing. Having the window blinds raised ensures that there are more eyes looking out.
More eyes equal more chances for someone to see any potential issues or problems that may have arisen or that have not yet been spotted. From where passengers are seated they can see the wings, engines, and other parts of the plane body that the pilots up front cannot see or that the cabin crew missed because they’re busy working.
The idea is that a passenger who spots an issue, or what he thinks could be an issue, will report it and raise the alarm so that the crew can evaluate and respond. While we may never know how many crashes have been avoided because of this one simple safety precaution, it’s undoubtedly saved a number of lives.
It makes sense and it’s not a lot to ask for people to open the window shades at key times during the flight. Every design aspect and all of the inconspicuous, seemingly minor, details really do serve very important safety functions.
It’s because of this that the airline industry has the best record on file in regards to passenger safety and transportation. According to Discovery, the odds of a person dying in a plane crash are 1:11 million, whereas the odds of dying in a car accident are 1:5,000. In comparison, the odds of being killed by a shark are 1:3.7 million (National Geographic).
Those odds put it all in perspective; it’s extremely rare to find yourself in an aviation accident, let alone die in one, thanks in part to open shades.
Please Share This Story With Family and Friends
She Breaks Her Window Blinds Purposely. But What She Creates Is An Unexpected STUNNING Surprise!
Many people love decorating their houses and making it as cozy and comfortable as can be. Interior design is hugely popular and many retail stores are dedicated to the art of interior decorating. They offer everything from rugs, mugs, and vases to the kitchen sink.
However, many of the items found in stores are expensive and only available in limited styles. This is especially true when it comes to window coverings and blinds. While the options run from basic to fancy, the cost increases exponentially as you move up from mini blinds to silk curtains or cedar paneled shades.
If you want gorgeous, custom made window coverings it’s going to cost you, unless you make them yourself! The folks at Better Homes and Gardens made this easy to follow tutorial on how to turn basic mini blinds into beautiful roman shades.
It’s a much more affordable alternative to ordering custom ones and all it requires is a few things that you likely already have on hand. Those items are; white faux wood blinds, thick upholstery fabric, mod podge and a small container for it, a foam brush, pencil, scissors, clothespins, tape measure, and an iron.
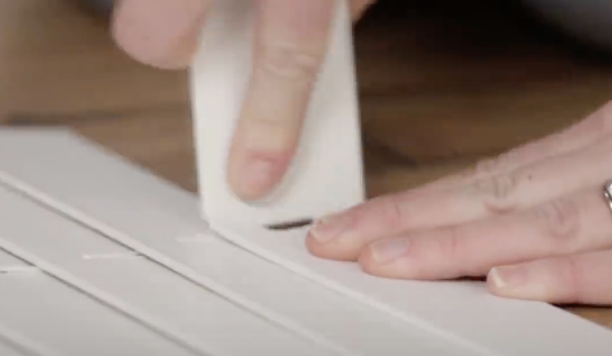
Measure how long the blinds need to be before you begin, then lay them on a flat surface facing down. Extend them out to the desired length and cut away the string that connects all of the slats, aka the ladder string, on both sides. Be very careful to avoid cutting the single, thicker cord that moves the shades up and down, because you’re going to need it.
Each slat is going to be 7 inches apart, to figure out how many slats you’ll need simply take the length of the window in inches and divide it by 7, then snap off any extra slats you don’t need. Next, take the fabric and lay it on a flat surface, place the blinds atop it and evenly space out the remaining slats.
Use the tape measure to ensure that they’re approximately 7 inches apart, this way the blinds will fold up neat and evenly.Measure the fabric so that it extends 2 inches beyond the edge of the slats and 2 inches beyond the top and bottom as well.
If you need to, iron the edges so that the fabric will form a more even hem. Make sure that the blind operation, the part where the strings come out of the top and extend down from, is placed on the back of the fabric. Remove the stopper, located at the end of the top bracket, and use a pair of scissors to cut a notch in the fabric so that it’ll wrap neatly around that end.
Break out the foam brush and use it to apply a coat of mod podge to both the end of the bracket and the fabric. Wrap the piece of glued fabric around the top of the bracket, press it down firmly and secure it with clothespins while it dries.
Moving down each side, apply glue to the end of each slat and the fabric portion that extends out beyond it, then fold the fabric over and onto the end of the slat and secure with more clothespins. At the bottom of the blinds take the fabric and roll it over so that it forms a clean edge. Brush the bottom bar with mod podge and glue the fabric into place, securing it with clothespins.
Allow the glue to dry completely before removing all the clothespins, and at that point they’re ready to be hung. The shades will still be operational like normal mini blinds, but a lot more appealing and better looking. Plus, things won’t get snagged or hung up in them, (like cat paws!). Best of all, they can be customized to your exact tastes at a fraction of the cost of what you’d end up paying retail.
If you want to give your house or just one room an instant upgrade, try this out!
Please Share This Blinds Hack With Family and Friends


