
She Starts Cutting Into Her Old Leggings. When She’s Finished It’s STUNNING

Do you have an old pair of leggings that you never wear anymore, or don’t fit into? Clear up some closet space, but instead of tossing anything out, try getting creative and give those tired pants a style upgrade! All you need is a pair of scissors and a few strategic cuts to transform your leggings into a cute new crop top shirt. YouTube’s Handimania channel has an excellent DIY tutorial that shows you how to easily do exactly that, and it’s impossible to mess this one up. Don’t worry about having to sew or glue anything, there is none of that. In under a minute’s worth of time you’ll be all done, so be sure to check this out and try it later. Plus, who doesn’t want a shirt that’s basically free, in style, looks great on, and that you can say you made all by yourself!
The first step is to lay out the leggings on a flat surface and fold them in half the long way, so that one leg overlaps the other and rests directly on top of it. Make sure you smooth out the fabric as evenly as possible and then grab a pair of sharp scissors. In one hand, pinch the seams where they meet in the crotch area and pull the fabric tight. Begin to cut with your other hand, starting from about an inch or so below where you are pinching. Cut out a half-circle shape, which will become the neckline for the top. It can be further cut and adjusted so that you get the desired fit you’re looking for. When you put your new shirt on be aware that the legs are now the sleeves and the waistline is now the bottom part of the shirt.
This fashion trick is the perfect way to up-cycle and reuse leggings that no longer fit, or to revamp ones that you love but wore way too much. It actually looks great too and it’s super quick and easy. Just make sure to cut both sides of the pants evenly so that the neck line isn’t off or irregular. That’s all there is to it, you only need to make one cut and there is no reason why you shouldn’t try this today!
Please Share This Trick With Family and Friends
She Mixes Crayons With Crisco For One Weird Reason. But The Final Result Is Stunning!
Many people love having candles on hand around the house. Scented ones make the air smell wonderful and certain types, such as citronella ones, help to keep the bugs away. Whether you use them to add a little warm ambiance to a room, or keep some close by in case the power goes out, it’s always a good idea to have several extra on hand. A major downside to candles is that they can be quite expensive especially if you want a quality one that burns for many hours.
Instead of buying them, save yourself a bunch of money and get creative by making your own custom colored and scented candles. In this YouTube video Lisa Pullano gives a step by step tutorial on how to make candles at home using Crisco and a few other supplies you may already have on hand or that you can pick up at any craft store for a few dollars.
The main item these candles require is Crisco, or vegetable shortening, plus canning jars with lids, cotton candle wicks, oil soluble dyes, oil pastel crayons, fragrance or citronella oils, and various things that can be used to decorate them. Take a fire-safe container, like a glass canning jar or bottle, and hot glue a candle wick to the bottom of it.
If the jar is tall slip the wick through a straw to help keep it in place later, and if the jar is large use 2-3 wicks. Using a double boiler method, melt some Crisco in a glass container over low to medium heat, then allow it to cool for 10-20 minutes. Be very careful melting Crisco since it’s highly flammable and if you ever have the misfortune of a grease fire extinguish it by smothering the flames with a pot lid, salt, or baking soda (never use water!).
Take a lollipop stick, or any similar object, and tie the glued wick to it, then lay it across the jar opening. Melt in either candle wax, crayons, oil pastels, or makeup with mica in it to add color. If you want them scented use candle fragrance oil or essential oil, and for bug repellent ones use about 5-10 drops of citronella oil. Pour the colored and/or scented oil into the candle holder jars and wait about 5 hours for them to solidify before using. To speed the process up you can place them in the fridge for 35 minutes.
These candles make wonderful gifts and can be easily decorated to your liking. The video shows jars spruced up with lace appliques, seashells, ornaments, spray paint, ribbons, and more. Check out the video for more details and further instructions.
Please Share this fun, inexpensive, crafty idea with friends and family! 🙂
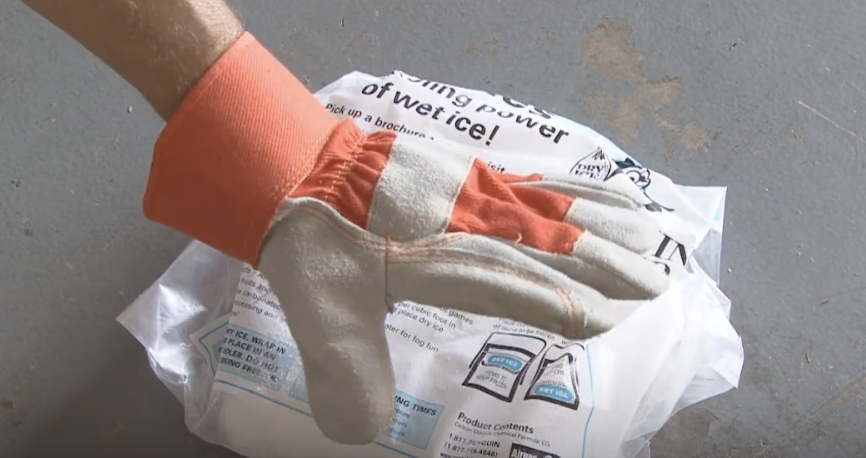
He Attached THIS Hose To A Coffee Can. The Final Result Is Unexpectedly Awesome!
There’s something about dry ice that just fascinates people. Maybe it has something to do with it’s powerful nature that makes it so dramatic! It was once the “go-to”, before refrigeration, to get perishable items sent long distance. Today, in the medical and scientific fields, it is still widely used for cooling.
This DIY revolves around the more theatrical nature of dry ice. YouTuber KipKay cleverly shows us how to manipulate dry ice to become misty fog, that happens when it gets converted from solid to gas. It’s a great weekend project to do with your friends or kids.
For those of you who just love the mysterious atmosphere created by a fog machine, watch this creation and let us know if you have fun making it. Always remember that you need proper ventilation when manipulating dry ice, because it is carbon dioxide. Keep your work space filled with oxygen!
Please Share This With Family and Friends 🙂
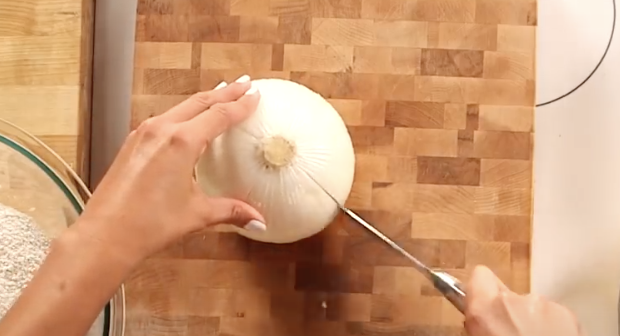
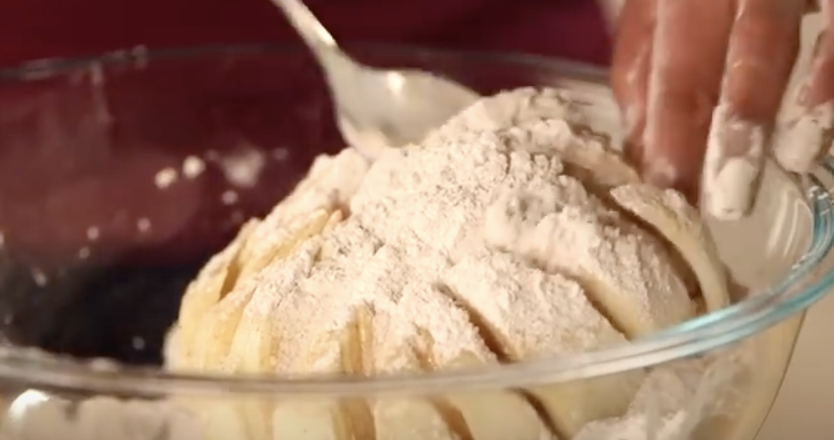
She Dips An Entire Onion Into A Pot Of Boiling Oil. The Final Result An Unexpected Delicious Surprise!
I don’t know about you, but the smell of onions cooking in my home is somehow better than that aroma in even the best of restaurants. It gives me a feeling of coziness and offering something delicious to my friends and family that’s from the heart!

YouTuber POPSUGAR offers us a 5-minute video recipe of the “Blooming Onion” that looks really easy and fun to try at home, and results in something really pleasing to view. Watching this truly made me want to try this magical recipe; I could practically smell the gorgeous petal onion at the finale!
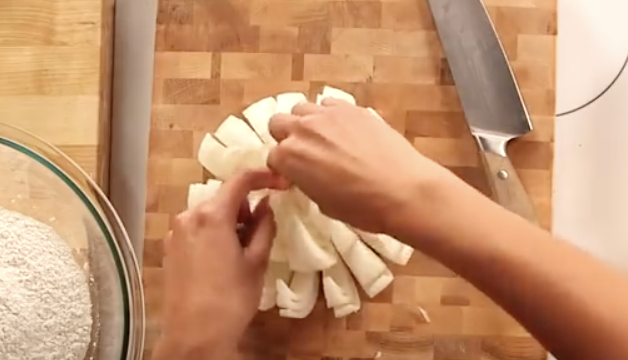
All that it takes to make this is a large sweet onion, flour, spices and oil. Timing is everything in this recipe so that your final product is crispy. Enjoy this fun video and let us know if you try the recipe that results in this golden brown delicious masterpiece. Let us know how it comes out!
Please Share this recipe with your friends and family 🙂
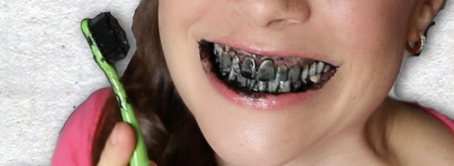
This Is A Very Strange Way To Whiten Your Teeth. I’m So Happy I Learned THIS
While the process is counter-intuitive to the result, this woman is living proof that charcoal makes beautifully white teeth. The natural substance is a less harsh way to dazzle your pearly whites than using traditional chemical treatments.

It also is extremely more cost efficient as a bottle of activated charcoal capsules can be purchased for around five dollars, where as professional teeth whitening systems can cost hundreds.
Activated charcoal, or activated carbon, is widely known as a medication used for various types of orally ingested poisoning, as it binds to the poison to inhibit absorption into the body. This is only recommended if the type of poison is not acidic, alkaline, or petroleum based.
If charcoal gets into the lungs, it can cause pulmonary aspiration which could be fatal without immediate medical assistance. The over-the-counter treatment can also be used to remedy diarrhea, indigestion, and flatulence, as it reduces intestinal gas content.

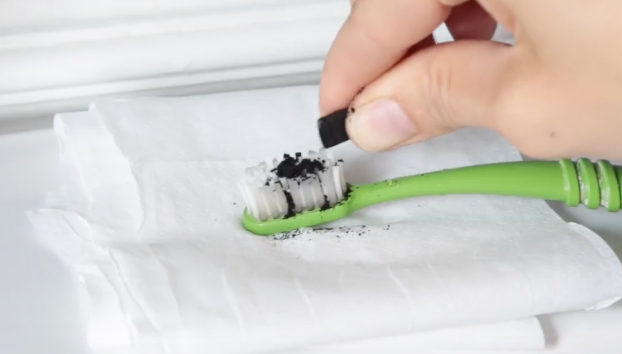
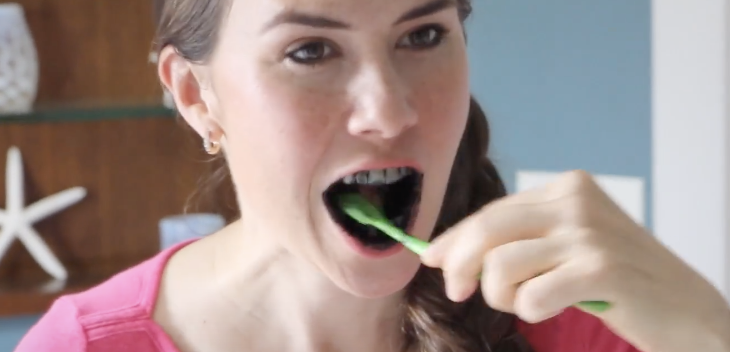
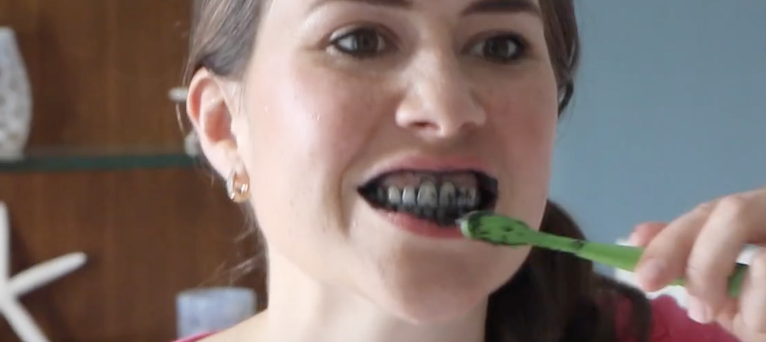
As a teeth whitener, activated charcoal is easy to use. After wetting a tooth brush, empty a capsule of charcoal onto the bristles. Then brush your teeth with the powder for several minutes. Once all of your teeth have been sufficiently covered, rinse with water.
Extra care is required to rinse the charcoal, as it can be very messy. Your teeth will feel sparkly clean! Repeat the treatment once per day for three to five days, depending on the amount of stain on your teeth. Maintain your bright smile by using the charcoal again every few months.
Please Share This Teeth Whitening Hack With Family and Friends
He Dips A Lighbulb Under The Faucet. But When He’s Done The Most Unexpected Surprise!
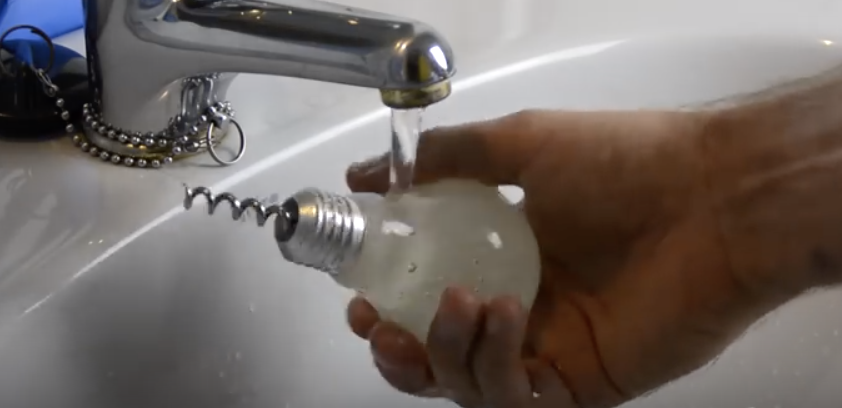
The next time you replace an old light bulb don’t throw it out. Instead, reuse and recycle it to make a bunch of cool, new, handy things. This video from YouTube’s Shake the Future channel will show you how to make 5 different things from an old bulb. Check it out and read on below for more information on the projects covered in the video!
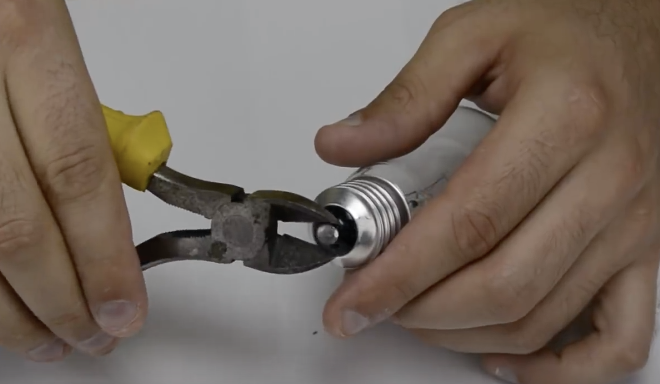
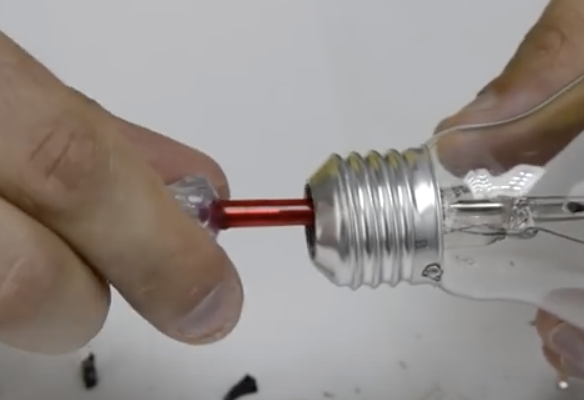
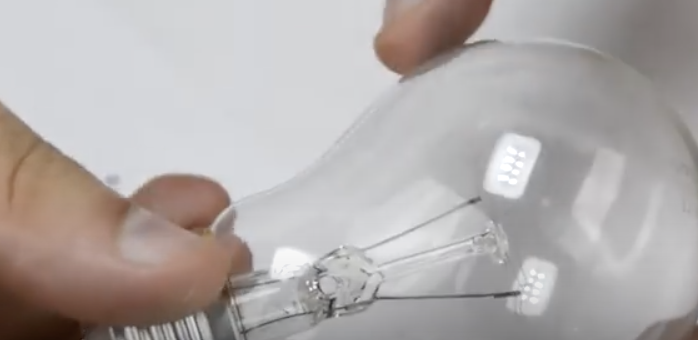
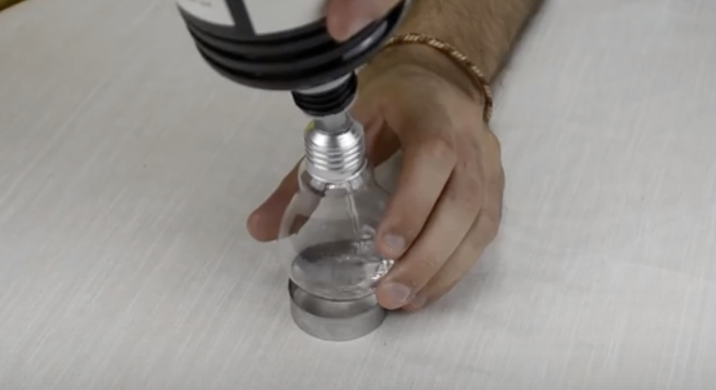
Make sure to use protection and wear safety goggles and gloves. The last thing you want is sharp glass fragments flying into your eye or a cut finger! To prepare the bulb use a utility knife and separate the contact from the surrounding black glass on the bottom. Take a small flat head screwdriver and twist it around the black glass until it breaks, remove the rest with pliers.
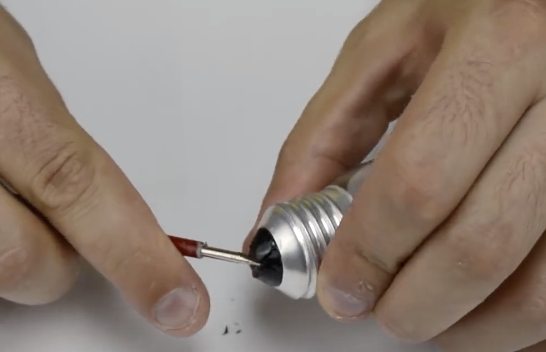
Reach into the bulb and break the stem with a small flat head screwdriver, then use a bigger one to loosen and break the inside filament. Empty out everything and if you need to make the hole bigger slowly apply more pressure to the surrounding edges. Wash out the bulb, let it dry, and now you can use it for a variety of things.
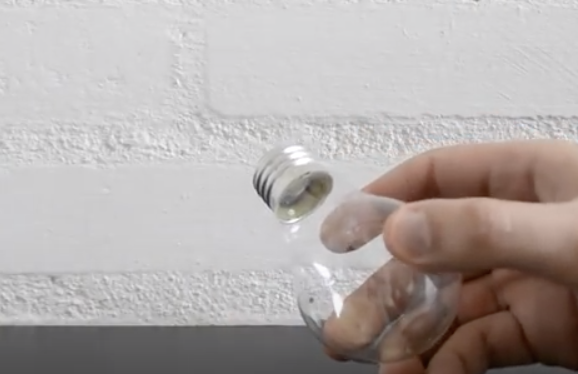
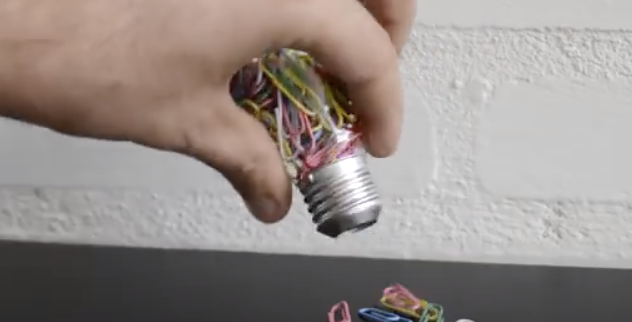
The first way in which you can use an old light bulb is as a handy paperclip dispenser. Place some paperclips inside and shake it upside down when you need one. It also makes a neat flower vase. Fill the bulb halfway up with water, stick in a flower or two, then place it on a small round cookie cutter to stabilize it.
For this next project you only need to remove the bottom of the bulb. Take a solar garden light and glue a string to it, then glue the bulb to the light so it forms a base. Hang it in a sunny spot and voila, you have a new solar light. Alternatively, you can make a light bulb torch.
Use a high temperature sealant to attach a washer to the bottom of the bulb and place it on a cookie cutter base before filling with paraffin based fuel. Insert a wick, wait 10 minutes to soak up the fuel, then you can light it. Make sure to never leave this unattended!
Finally, make a cool corkscrew by removing the worm, the pointed metal helix part, from an old or cheap one and place a small screw through the bottom hole. Fill a light bulb with InstaMorph, a mold-able plastic product, place it in the oven to melt then remove it and top off with more InstaMorph.
Put it back in the oven to melt again and repeat this until it’s filled with melted plastic. Push the worm into the bulb opening and hold it in place for 10 minutes while the plastic cools. Once it has cooled further you can run it under cold water to speed up the process. Finally, when it’s completely cooled off take a hammer and break the glass, now you have a light bulb corkscrew!

Please Share These Light Bulb Hacks With Family and Friends 🙂


