
This Woman Pours Baking Soda Onto Her Entire Mattress The Reason Is The Best Life Hack Ever!
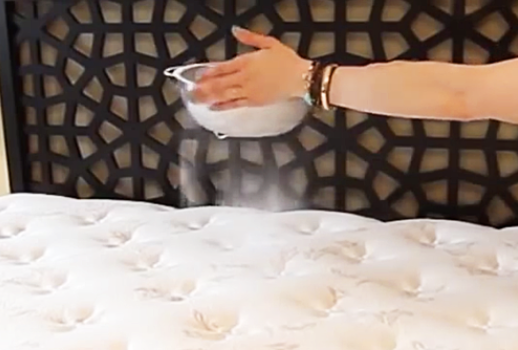
image via – youtube.com
On average, we spend around one third of our lives in bed and every single night we perspire out about ½ a pint of sweat. That’s a lot of sweat, especially considering that we replace our mattresses only after having slept on it for hundreds, if not thousands, of nights in a row.
On top of the sweat and dust that mattresses pick up there’s also dirt, food crumbs, other spills, blood, soil, and who knows what that accumulates on our beds. People rarely clean their mattress, if at all, and it’s clear to see why; they’re hard to clean! You can’t stick it in the washer and where would you even begin?
Thankfully Melissa Maker, of the YouTube channel Clean My Space, posted a video explaining how to clean and maintain a mattress so that it will stay fresh and comfortable for longer than ever. She covers a lot of insightful tricks and information, and here are a few of her best tips:
Vacuum Your Mattress- This removes a lot of the dead skin cells, dust, and other stuff that accumulates over time on your mattress. She recommends vacuuming every time that you rotate it and stresses that you use a clean upholstery attachment. If you don’t use a clean one, you run the risk of spreading even more dirt and crud onto your bed.
Deodorize Your Mattress- Make it smell fresh again with the odor neutralizing power of wonderfully affordable baking soda. All you have to do is sift some baking soda all over the top of the mattress and allow it to sit. After about 30 minutes vacuum it up with a clean upholstery attachment.
Stain Fighting- According to Melissa, stains come in 3 varieties which include protein, grease, and tannin. The protein type is the most common one you’re likely to encounter and blood, sweat, vomit, and urine all fall under this category.
The best way combat these types of stains is by cleaning them ASAP before they have time to really set in. Liquid stains should always be blotted up with a cool damp cloth. Never scrub or use warm/hot water because that sets it and will only make it worse.
DIY Cleaning Solutions- If you’re dealing with a fresh stain it can be treated with a mixture of equal parts salt, baking soda, and water. Mix this into a paste, apply it directly onto the stain, and brush it off 30 minutes later.
Then, using a cool damp cloth, wipe away any excess mixture that may still be on the mattress and allow it to fully dry. If that doesn’t work quite as well as you’d like, try this stronger cleaning mixture of 2 parts hydrogen peroxide combined with one part dish soap.
Place a very small amount of this solution on the stain and softly brush it in with a clean toothbrush. After about 5 minutes you can wipe it off with a cool damp cloth.
Keep Your Mattress Dry- In general, aim to keep all liquids off your bed. A key factor in both cleaning and maintaining a mattress is to always make sure that it’s completely dry before using or sleeping on it. If and when you need to clean it or it does get wet, use fans to help it dry faster.
If you fail to allow it completely dry you risk ending up with mold or other nasty things growing on it, so take the time to allow it to dry!
Flip Your Mattress- This should be done every season or at least twice a year. Also, rotate it around so that you are not always sleeping on one part of the mattress. Rotating helps the mattress stay even all around, especially if you and/or your partner tend to sleep on certain sides and do not weigh the same.
Now you know how to clean a mattress and hopefully you can put some of this information and these awesome tips to good use. Try them today and be rewarded with a better night’s sleep!
Let us know how the life hacks work for you! Enjoy!
Please Share This With Your Family and Friends
Do You Have Old Tarnished Silver? THIS GENIUS Trick Will Make It Shine and Look Brand New!
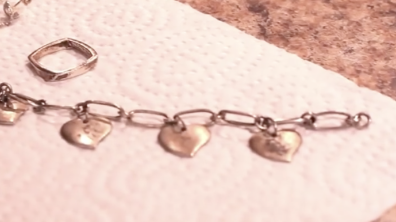
image via – youtube.com
I love the look of silver jewelry, but no matter how you cut it, silver becomes tarnished over time. What happens to me, is these pieces get shoved to the back of my jewelry case, because I hate dealing with silver polish.
When I saw the video you are about to watch below, I was so pleased to find an easy and inexpensive way to clean my silver jewelry in minutes. Cleaning expert, Melissa Maker of YouTube channel “Clean My Place”, hosts this amazing remedy for tarnished silver.
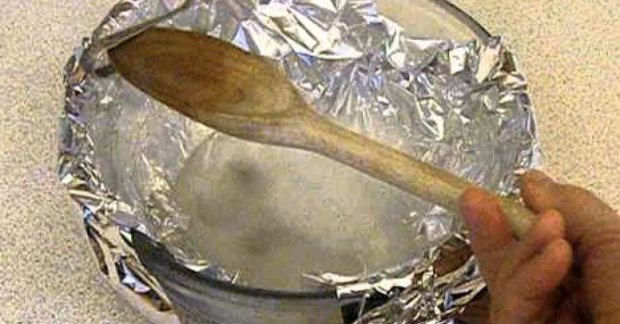
This is the coolest, almost magical way to shine up your favorite silver to perfection, without that horrible black residue that silver polish leaves on your hands. This trick requires a bowl, aluminum foil, some salt, baking soda, boiling water and finally plain white vinegar.
Melissa’s tutorial will give you the exact amounts for this concoction. The key to this chemical reaction working, is making sure all your jewelry pieces lie flat on the foil. You won’t believe the before and afters.
The best think about this mixture is that it cleans all the nooks and crannies without having to scoop out stubborn silver polish.
Please SHARE This With Family and Friends
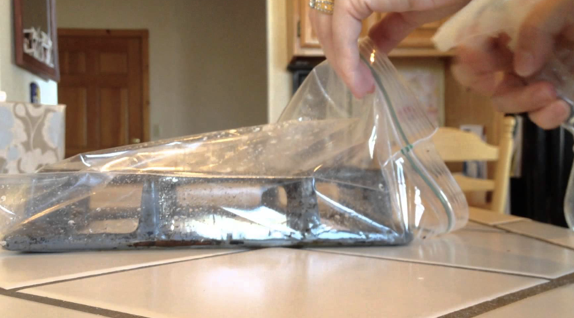
I Could Never Figure Out How To Get My Stove Grates Clean. Then I Learned THIS Strange Trick!
If you cook a lot of food and dinners up at home, your stove is bound to get dirty. It’s one of the hardest areas to clean in the kitchen and it’s extremely important to take care of it. Baked on crud that builds up on stove top burners can be a health and safety hazard and if you want the stove to last, you have to clean it thoroughly once in awhile.
The problem with that is it can be a real pain in the behind getting those black crusted grates looking like new again. Now you don’t have to scrub them endlessly and risk scratching the heck out of them, because DIY Super Mom tested out an easy way to clean them up. The method she covered in this video takes minimum effort and works wonders at removing built up grease, grime, and food from burners.
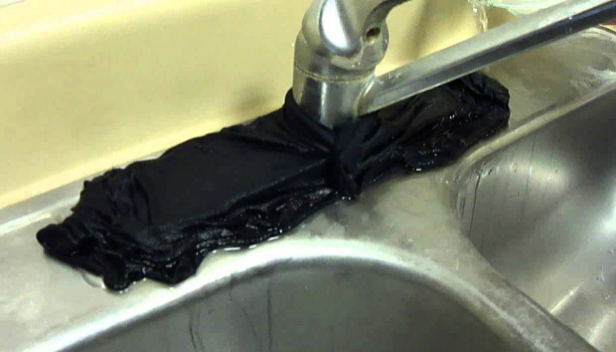
All you really need to clean them is ammonia and a large Ziploc plastic bag. Here’s how you can do it: First, pour some ammonia into a spray bottle and place the dirty burner into the bag. Spray some ammonia all over the burner while it’s in the bag, so that it’s completely coated, then seal it closed so that all of the nasty fumes are trapped and locked inside.
Gently shake the bag and turn it over a few times to agitate the liquid inside and to ensure that all of the cracks, corners, and crevices are soaked in it. Allow the bag to sit overnight while the ammonia works to loosen up and dislodge the baked on food.
Open up the bag the following day and remove the burner, placing it somewhere safe that you can scrub it, like in the kitchen sink. Put on a pair of rubber gloves and use a sponge to wipe off the rest of the black, icky crud. It should come off easily and since you don’t need to scrub hard or scour, it won’t scratch the grates.
The next time you notice your stove top is looking a little worse for wear, pop the grates in a bag and try this simple and effective cleaning trick. It’ll have your stove top burners looking clean and polished without the use of harsh, expensive cleaning supplies that stores sell.
Best of all, you won’t have to scrub until your arm feels like it’s falling off!
Please Share This With Family and Friends
The Easiest Way To Remove Dark Under Eye Circles For Good With Only One Ingredient!
Dark under eye circles are a beauty issue for many women and men. The unsightly blemishes are commonly seen as a sign of fatigue and lack of sleep but there are a number of other possible causes. They may first appear in childhood and this could point to them being inherited.
Dark circles have also been attributed to allergies and nasal congestion which dilates certain blood vessels around the eyes and causes them to darken. Other possibilities include stress, anemia, oversleeping, eczema, crying, too much salt in ones diet, aging, and excessive drinking, smoking, or sun exposure.
In addition, they may also be a symptom of a more serious condition, such as liver disease or hypothyroidism. Many products and treatments have been touted as effective at making dark under eye circles go away. However, most of them are ineffective and don’t really do anything and some may even damage the fragile skin under our eyes.
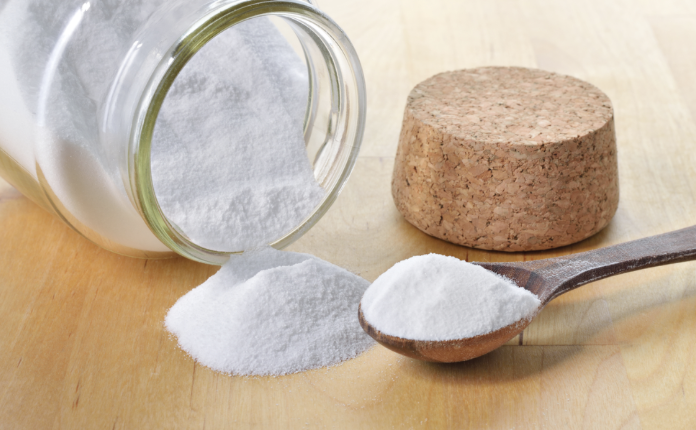
If you want to try an affordable, simple, all natural way to eliminate dark circles then try this at home remedy. All you need is baking soda, hot water or tea, and a few cotton pads. Take a glass of either tea or hot water and mix in well one teaspoon of baking soda.
Then soak two cotton pads in the solution and gently place them under your eyes for a total of 15 minutes. After you remove the pads wash your face and finish up with an application of moisturizer. Baking soda has been used in a number of at home beauty and personal care treatments.
It also works well to both clean and help fade scars caused by acne. The recipe and directions for an exfoliating baking soda acne scrub are as follows. Combine one teaspoon of baking soda and a drop of water on a plate and mix it up well.
You do not want to add too much water so slowly add one drop at a time, adding more if needed, until it has the consistency of a paste and not a runny liquid. Gently massage the mixture onto your face and let it sit for a couple of minutes or until it hardens, then wash your face well.
Over time this solution should fade any scars as it gently cleans your pores and skin. It can be applied nightly before bed and many people have reported that this is helpful and works! Baking soda works well at cleaning because it is effective at regulating pH since it’s not overly acidic or too alkaline, rather it falls right in the middle.
Thus, when it interacts with things that are either acidic or alkaline it naturally reacts to neutralize them. This is what makes baking soda so great at combating acidic odors that make our fridges smell. It also works well to maintain balanced, neutral pH levels and when it’s added to water and applied to things it serves to make stuff even more clean.
Best of all it’s extremely affordable, natural, and it doesn’t harm the environment like most of the ingredients that are found in beauty products do. Try one of these applications tonight before bed and see the results for yourself!
For more information on removing dark under eye circles Watch the video below
Please Share This Story With Family and Friends 🙂
An Unexpected and Easy Way To Make Tarnished and Grimy Jewelry Look Surprisingly New With Stuff Already In Your Kitchen!
If you wear a lot of silver jewelry, that you constantly find becoming tarnished and unwearable, you will want to watch the following video. I know I don’t have the time to constantly run to the jeweler to have my stuff cleaned. Not only does the following alternative work for cleaning silver jewelry, but for any silver serving items or home accessories that you suddenly realize are tarnished.
What is great about this remedy is that it requires very little elbow grease. To clean your silver at home, all that is required are the following items: a glass bowl, aluminum foil, salt, baking soda, boiling water and dish detergent. For proportions of each item just watch this easy to follow DIY.
There is a miraculous chemical reaction that occurs within 10 minutes of soaking in the aluminum covered bowl; the bicarbonate of soda and the foil chemically attract to loosen the grime from the silver! Watch how easily your silver shines as it is removed from the liquid mixture and dried off with a cloth or paper towel.
An old toothbrush can be used to get into any small crevices. I tried this right after watching this video and Voila! It really works! It actually works safely for all metals.
Please SHARE this with family and friends
The Simple Way To Remove Hard Water Deposits On Your Faucets And Sinks. I’m So Glad I Learned THIS
Hard water can be a real pain in the neck when it comes to the unsightly stains that it leaves behind on bathroom and kitchen surfaces. Those blemishes are nasty looking and it can be extremely hard to fully remove them. The ugly spots and stains are caused by water that contains large amounts of minerals such as limestone, calcium, and magnesium.
These metals and minerals are naturally occurring, most often in areas with low water tables and mountainous regions, and water that contains them is perfectly safe to use and drink. The biggest downside to it is the crusty, whitish colored mineral deposits and stubborn stains that it leaves behind, which over time gradually build up on stuff.
Many people struggle to remove these stains and often think that they need strong, harsh chemical cleaners to get rid of them effectively. However, there is a better, more simple, and affordable way to go about cleaning surfaces with mineral build up that has been caused by hard water.
In this easy to follow tutorial YouTube’s Crouton Crackerjacks channel shows us how to clean a kitchen sink. Watch the video for more information and to see how it turns out, and read on to see how it’s done. Start off by placing a bowl in the sink and pour some distilled white vinegar in it.
Take an old cotton cloth, rag, towel, or whatever you have on hand and fully soak it in the vinegar. Make sure the sink is completely dry and not wet in any places, especially the cracks. Drape the soaked towel on the surfaces that are stained and press it firmly against the sink and into any seams or cracks.
Let it sit for an hour, then place it back into the vinegar. Take an old, worn sponge and gently scrub the sink to further remove the hard water stains. You should notice the whiteness coming off and the sink getting shinier. Take your rag and again place it on any remaining stains, paying attention to areas that are more built up, and leave it on for an hour. Repeat the gentle scrubbing as before and you should have a shiny, sparkly, clean and renewed sink!
This works for porcelain surfaces as well, and if you need a quick and easy way to brighten up the commode, read on. Grab a roll of paper towels, distilled white vinegar, and a pair of rubber gloves. Pour some vinegar onto paper towel squares so they are soaked, then fold them up and place them all around the rim of the toilet, making sure to cover all the stains.
Stick them to the inside bowl and as close to the water line as you can get without them touching the water. Then, fill the bowl with vinegar until it is above the stains. Let this sit for a few hours while the vinegar works before removing the paper towels from the rim and bowl, and scrub away any remaining stains. Make sure to fish out any paper towels from the water and don’t flush them because they will clog pipes and the septic system.
This may be the fastest, easiest, and most natural way to clean hard water stains. It requires minimal effort or exertion on your part so try it the next time you clean the house!
Please Share With This Trick With Family and Friends


