
Woman Places An Entire Spool Of Yarn Into Glue. The Final Result Is STUNNING!
If you’re anything like me then you probably think that yarn can only be used for knitting. Awhile ago I bought some thinking I’d learn how to knit but never quite got the hang of it, which left me with balls of yarn laying around unused. I was about to donate them until I stumbled upon this awesome DIY yarn lamp globe project. The finished piece looks uniquely beautiful and reminds me of one of those birds nest lamps that cost an arm and a leg. The decorative yarn globes and lampshade are easy to make and, best of all, inexpensive!
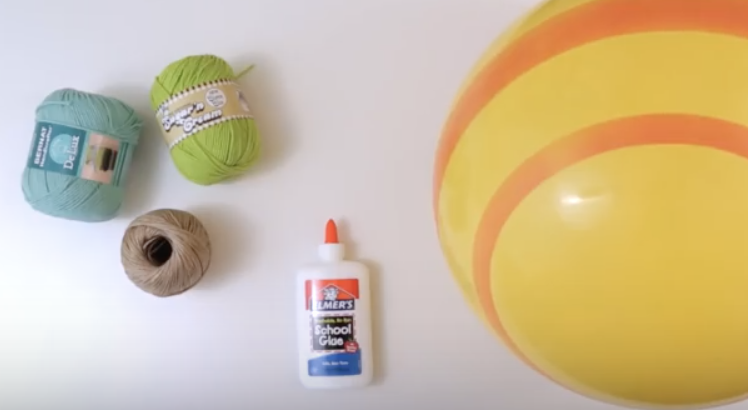
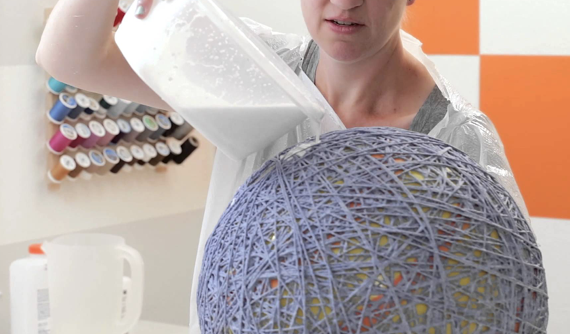
To start, you will need cotton yarn or hemp cord, standard school glue like Elmer’s (modge podge works too), and bouncy balls of whatever size(s) you desire. Cover up your work space and make an apron for yourself with plastic bags because this will get messy. If you plan on making a lamp, mark a large opening on the bottom where you insert the bulb, and a small one at the top for the cord, on the ball. Also, mark a spot for where you can deflate the ball later, to make it easier when the time comes.
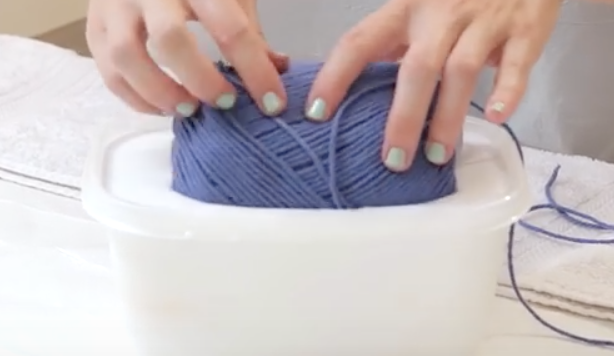
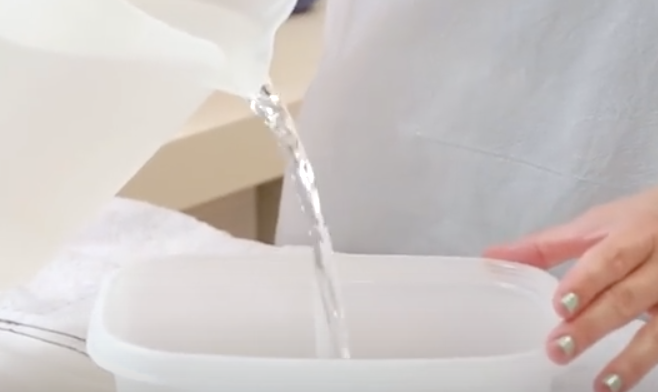
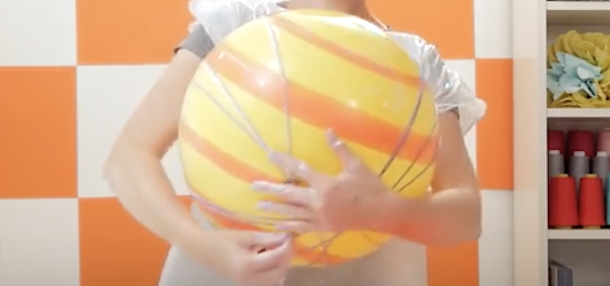
Now mix equal parts water and glue in a plastic container large enough to fit the ball of yarn in. Pull out the end of the yarn and then soak the entire ball in the glue. Begin to pull and unravel the glue soaked yarn and start to wrap it around the ball. When you start, hold the end you began with in place with one hand and wrap with the other until it stays on by itself. Be sure to avoid wrapping around the openings you marked off and wrap until you run out of yarn. Pour any remaining glue mixture over the string so it sets more solidly and focus on the edges around the holes.
Now make a new clean surface with a fresh plastic bag and set the ball there to dry. It will take at least 2 days for it to completely dry so place it somewhere it won’t be disturbed. Once it dries the original color of the yarn you used will return and when it hardens the glue causes it to have a wicker-like finish. Once it’s dry you can deflate the ball with a pin or other sharp point, let the air out slowly, and once it’s deflated enough you can pull the ball out of the large hole. You now have a yarn globe!
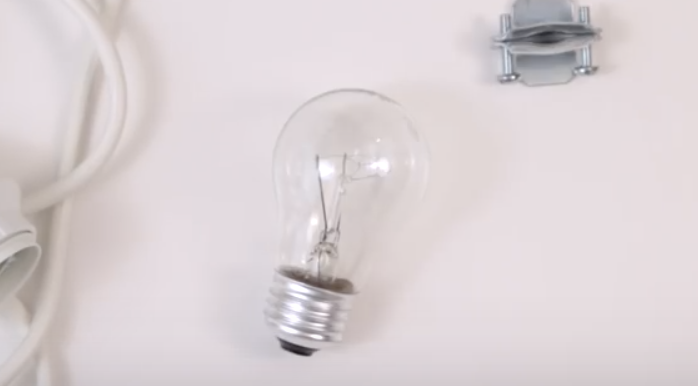
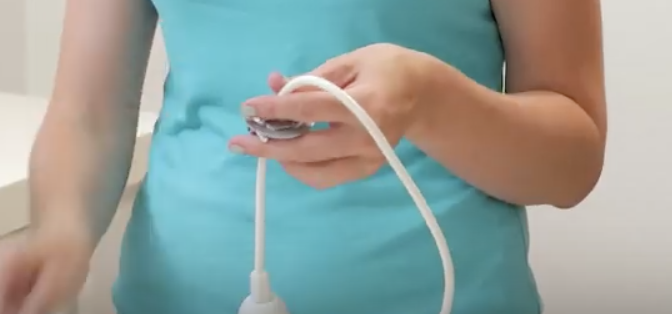
To construct the lamp you will need a hanging light fixture, a light bulb, a 3/8 inch two-piece metal clamp connector, and a 1 x 3/4 inch washer, which can all be bought at hardware store. To keep the light bulb centered in a larger sized lamp take the washer and slide it down the cord to the position you want it set at. Then take the metal clamp connector, clamp it on the washer, then screw it in place. That will prevent the cord from moving around and make the lamp safer. Screw in the bulb, plug it in, and test it out to see if any adjustments are needed. Now all that is left is to hang it up!
Please SHARE With Family and Friends
Apparently You Should Have Salt Lamps In Each Room Of Your House. This Is The Surprising Reason Why!

image via – youtube.com
Millions of years ago the Indian landmass collided with Asia and formed the Himalayan Mountains, which have been growing ever since. The immense range is where 9 of the world’s highest peaks are found, one of which boasts the highest elevation on Earth, Mount Everest.
Over a thousand miles away from Everest, in northern Pakistan, lies the foothills of the Salt Range. A shallow sea located there evaporated long ago, leaving behind tons of crystallized sea salt that’s buried deep below the mineral rich mountains. This is where most of the Himalayan pink sea salt is found and mined.
The salt mines have been open and active for hundreds of years, but the immense health benefits of Himalayan salt have only recently been widely recognized. The natural underground formation of the beds led to over 84 trace minerals being added to the salt including calcium, copper, sulfates, zinc, magnesium, iron and more, making it the most mineral dense type of salt in the world.
There are a number of excellent health benefits that Himalayan salt offers and you need not eat it to get all of them. Lamps made from the salt can do wonders for your health and home thanks to their natural air cleaning ability.
The salt lamps generate and give off negative ions which are oxygen ions that have an extra electron attached to them. They are found in nature near rivers, waterfalls, and other bodies of fresh flowing water. It’s believed that when we breathe them in they react with our bodies and produce positive effects.
When people report feeling happier, clearer, and more refreshed around these water sources, it’s generally attributed to the negative ions they are taking in. Think about and imagine the fresh air that comes after a thunderstorm, that air feels so good because it contains vast amounts of negative ions.
Another effect that negative ions have on our surroundings is that they can bond together with positive ions and thus neutralize them. Positive ions do not have a positive effect on our bodies. They are what TVs, microwaves, and other electronic devices create and put off and can be harmful to us.
Some people are affected more than others and may experience headaches, stress, allergies, and sleep issues from them. Placing a salt lamp in your home greatly reduces the presence of positive ions in the air, while simultaneously increasing the amount of negative ions.
Thus, they cut down on the harmful silent effects electronics have on us, which are often overlooked. The lamps are an easy way to make your environment and the air you breathe cleaner.
The following health benefits are what people report experiencing soon after using salt lamps, they include help with:
1. skin conditions
2. headaches, migraines
3. stress and stress-related disorders
4. insomnia
5. allergies and sinus issues
6. arthritis and rheumatism
7. respiratory problems and asthma
8. colds
9. increased circulation
The lamps leave your mind, body, and health all better off and all you have to do is switch a light on. To truly harness the healing power of salt lamps they should be placed all throughout the home and especially near electronic devices.
While one single lamp will have a positive effect, it won’t be strong enough to impact your health, so make sure to use several. Also, eating pink Himalayan sea salt is even more beneficial to your body than regular table salt, but that’s a whole other story.
Check out the video for more information and try out a few Himalayan salt lamps if you haven’t already done so yet! Do you already have one of these? Will you be getting one? Let us know!
Please Share This With Your Family and Friends
This Woman Put An Entire Spool Of Yarn Into Glue. But When She’s Done It’s STUNNING!
The most common thing that people usually use yarn for are items to knit; such things as scarves, sweaters and mittens. Unless you are a crafty person like Dana. I never fail to be astounded by how innovative and creative some people are. I certainly never would have thought of making the creation you are about to watch, but having seen it’s lovely outcome I can’t wait to try it!
What Dana does with: an inflatable bouncy ball, cotton yarn or hemp cord, and basic school glue is truly athing of beauty. What she creates is a yarn globe or lantern. She shows us how to prepare the ball and glue, and then demonstrates the winding process of the yarn. After she takes us through the steps which really look the FUN, she shows us how to turn our creation into an actual, usable lamp!
It’s really easy to remove the dried yarn from the ball. It’s a thing of beauty on it’s own. Then with 4 items: a hanging light fixture, lightbulb, clamp connector and a washer (available at any hardware store), she shows us how, within minutes, your colorful lantern becomes an amazing lamp.
I’m not kidding! It’s an actual beautiful modern lamp that you’d be proud to hang in your house. Let us know how yours comes out if you try it, and what you think about this amazing DIY, that comes from the Made Everyday site.
Please SHARE this video with your crafty friends and family on Facebook 🙂
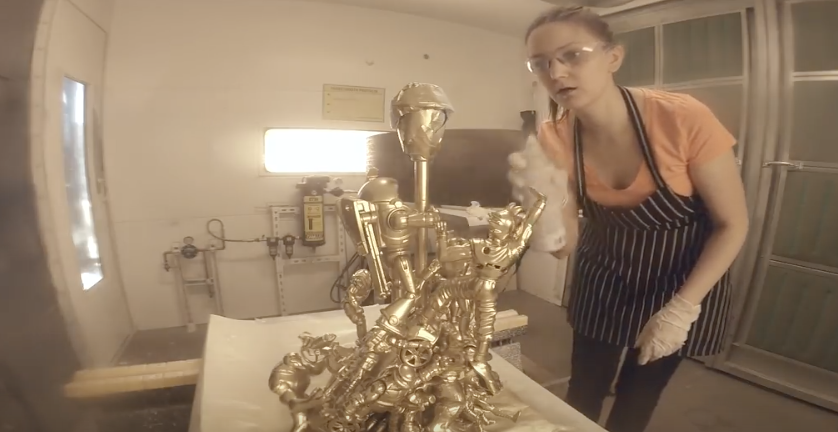
She Takes Her Old Toys Then Tapes And Sprays Them Gold. When She’s Finished I Must Do This!
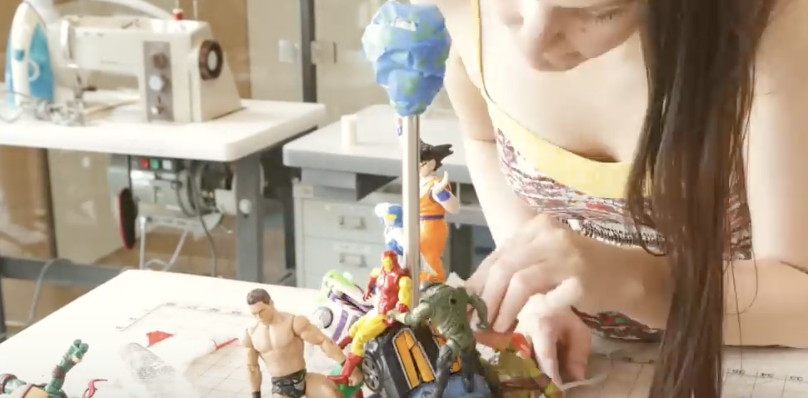
Do you have any old unused items laying around the house that are begging for a new look? Reuse your old stuff and recycle it into a new, one of a kind, gold lamp. That is what one woman chose to make with her old action figures, but the alternate possibilities are endless. Use this video and the technique shown as a guide for creating any type of lamp you want. As an alternative, try doing a similar project, such as spray-painting animal figurines gold, glue them to wood blocks, and thus make sturdy bookends.

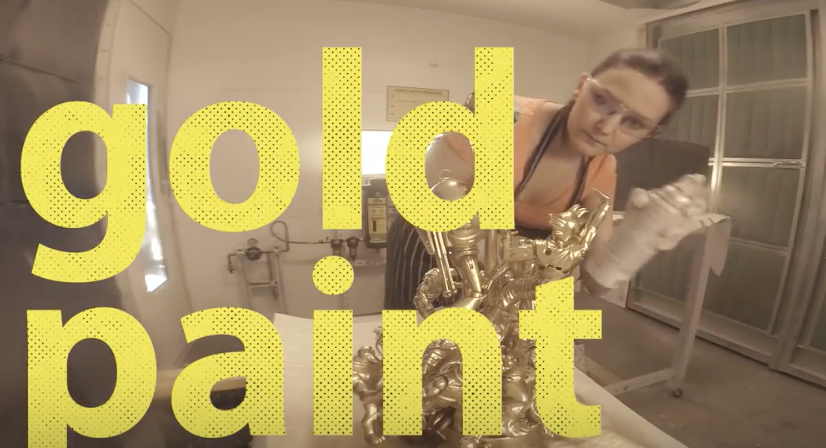
Whatever you decide or desire to make, it will look brand new when you cover it in gold spray-paint. There is just something special about the metallic finish that makes everything look spectacular and fresh again.
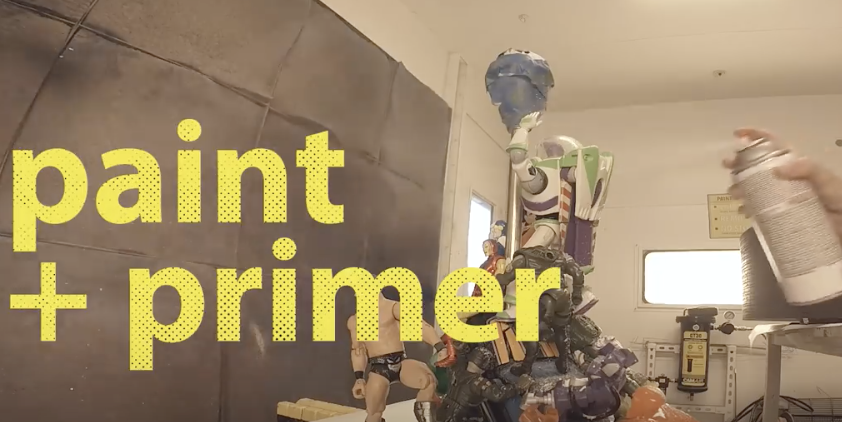
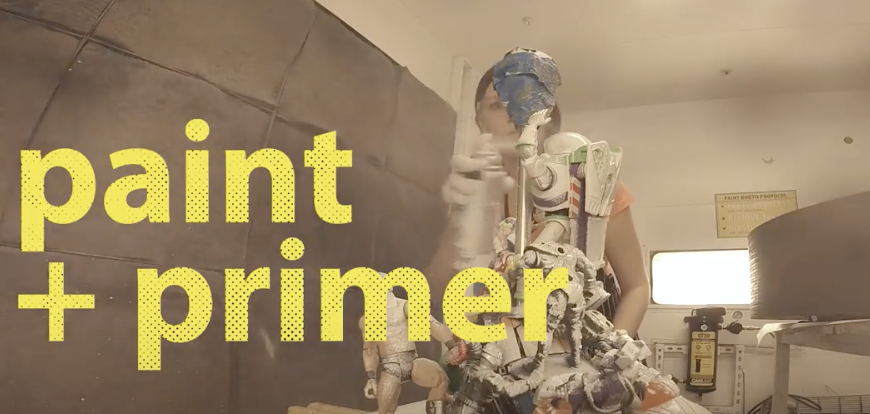
To begin, gather all your supplies including: action figures, spray paint, fine grit sandpaper, craft glue, super glue, painter’s tape, and a lamp. It is recommended that you prime the lamp first with a coat of white spray paint. This will give you better coverage and a more even finish when you go over it with the gold spray paint.
Try and choose a lamp that is tall and skinny so that the figurines or items you use stand out more. Also, harder plastics and materials will be easier to glue and spray paint than rubbery, soft ones. Cover and tape off the socket end of the lamp, cord part, and any other areas that you do not want painted. Lightly sand the entire thing, wipe the dust off, and allow it to completely dry. This will ensure that the glue and paint stick better.
Next, glue all the items or figurines onto the base of the lamp. Attach them to each other and use the glue to hold them in place. If needed, tape around them to better keep them in place while the glue sets. With figurines, the busier the piece the better it will look. Allow all glue to set and dry for 24 hours, then check and re-glue any loose parts.
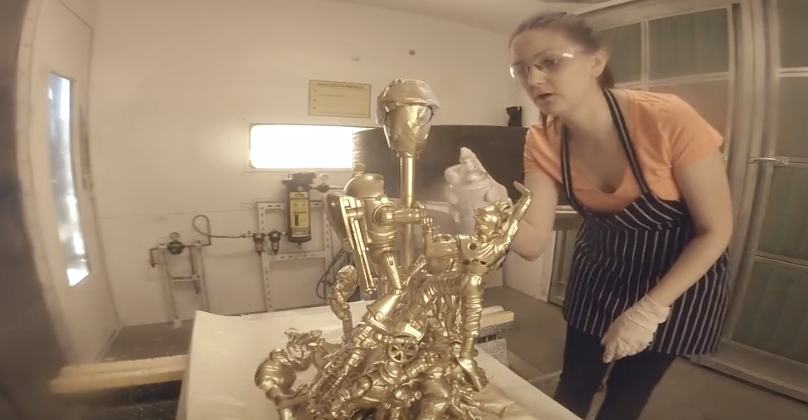
Coat with white primer, let it dry, then spray paint the gold on. Do several coats of each and let them dry in between so the colors look nicer and more even in the end. Remove the tape, add a lampshade that compliments the piece, screw in the light bulb and enjoy!
Please SHARE With Family and Friends


