
If You Have a Pair of Crocs, You Should Toss Them In The Trash Now.
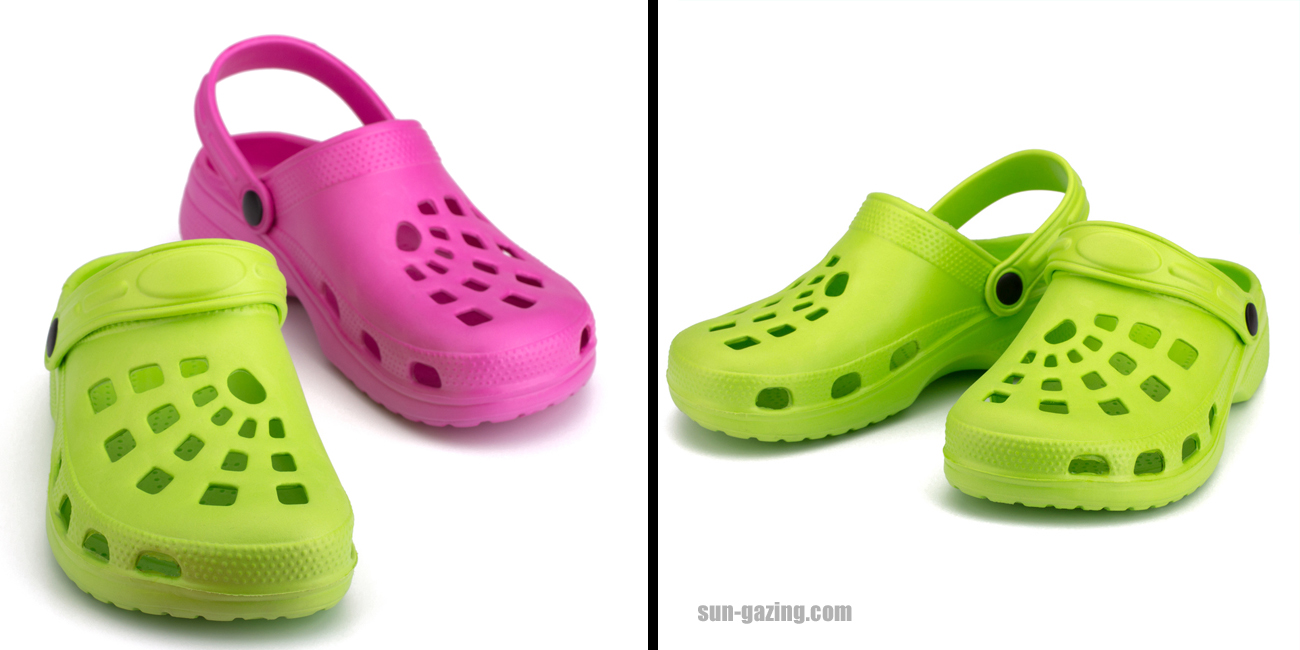 image via – shutterstock.com
Here we are in the heat of summer in many parts of the world, trying to stay cool and comfortable. As we navigate the imposing heat outside we not only wear more breathable clothes, but our footwear needs to allow our feet to breathe. Sandals have been the answer for hundreds, if not thousands of years…but they have evolved in modern times.
“Flip flops” have been around for many years, as well as the infamous “Crocs” that became the summer “go-to” more recently. For quite some time, the medical profession has warned about the dangers of flip flops, for the very reason people love them…ease of putting them on and slipping them off. They have now issued a serious safety warning about wearing Crocs as well, as an all day replacement for shoes.
When Crocs were introduced to the public, the company promoted them as not only comfortable, but actually possessing benefits for the feet that were therapeutic. They made these claims without any research to back them up. The problem lies in wearing these footwear all day, according to podiatrist Dr. Tom Beasley, because without containing a shank they provide no support for the foot. For children, who are still growing, the instability of Crocs can cause bone deformities and splayed feet. As children grow, so do their bones and tendons in their feet, requiring footwear that is supportive.
As you will hear in the VIDEO you are about to watch below, Crocs can pose the safety hazard of getting caught on ESCALATORS, causing serious injuries. There have been multiple reports of such injuries, resulting in law suits against the Crocs company. Unstable shoes like Crocs and flip flops have been known to get caught on gas pedals and brakes in cars as well, resulting in automobile accidents. After watching the footage below, let us know what you think about wearing this footwear out in the world.
Please SHARE this with your family and friends
She Gets A Toothbrush And Starts Plucking Out Every Bristle But When She Reveals The End Result Is AWESOME!
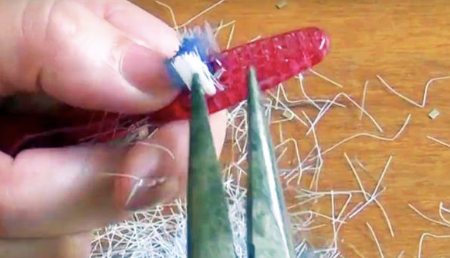
image via – facebook.com
Custom made jewelry can end up costing a pretty penny if you buy it at the store or online. Why not try making some one of a kind pieces at home that cost practically nothing and look just as beautiful as their pricier counterparts! With this tutorial, making your own arm candy can be extremely low cost, easy, and fun to do.
YouTuber Katrina Sherwood posted the creative method that she uses to make unique and inventive plastic bracelets on her blog “Katrinaosity.” The project is a hands-on way to re-use and recycle old plastic toothbrushes into trendy, colorful, 80s style bracelets, so you won’t waste or need to buy anything.
Even if you don’t have any old plastic toothbrushes laying around, they can easily be found at the store for well under five dollars. You can make lots of these and if you mess up it doesn’t matter, just keep going until you make the perfect accessory!
To create your very own bracelets you will need some plastic toothbrushes (the cheap kind work fine), needle nose pliers, a towel and oven mitts, heat resistant tongs, and a pot of hot water. To begin, start by first heating up the pot of water on the stove until it boils.
In the meantime, take the needle nose pliers and use them to rip out all of the bristles from the toothbrush heads. Once the bristles have been completely removed, place one toothbrush at a time in the boiling water for about 10 seconds or so. Using the heat resistant tongs, carefully remove the toothbrush and check to see how pliable it is with a towel or oven mitt protecting your hand.
If it bends enough to be folded into a bracelet shape that will fit around your wrist, it’s done. If it doesn’t, simply place it back in the boiling water for another 10 seconds or so, until it’s flexible enough to bend. The plastic will cool off quickly so you may have to re-boil it a few times until you get the toothbrush to bend into a wearable, desired shape.
These awesome looking, colorful, acrylic type bracelets are so easy to create and turn out beautiful. You can make a bunch and stack them, plus they can be custom made to match any outfit or look you are going for. Check out the video to learn more on how to make them and enjoy!
Please Share This With Family and Friends
She Buys A $2 Old Tarnished Cheese Grater But When She Reveals Her Transformation It’s AWESOME.
Do you have any old unused items laying around the house that are begging for a new look? Instead of tossing them out, give your old stuff a new life and recycle things into one of a kind pieces that you actually have a use for. All you need is a little imagination and creativity, plus a few craft supplies, and you can re-purpose just about anything.
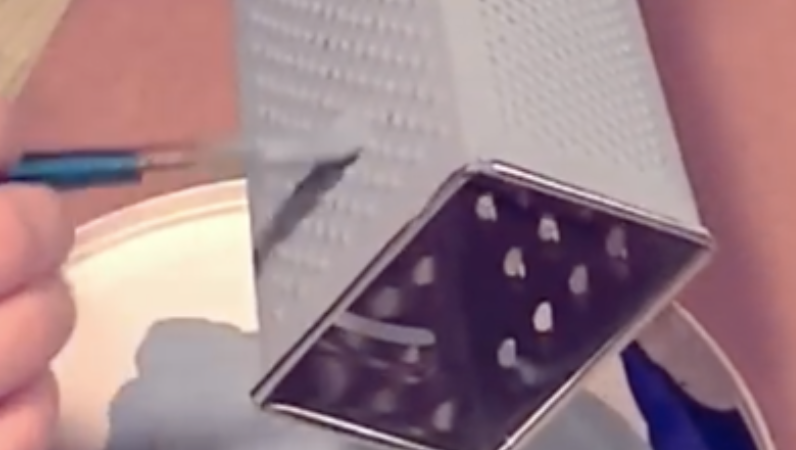
It also helps to have some ideas and videos with instructions showing you what to do, like this one from the Gibbz DIY channel on YouTube. It shows how an old, rusty cheese grater that no longer has any use can be transformed into a brand new jewelry holder.
To begin, gather all your supplies and you will need: a box cheese grater, medium sized pearl beads, 4 medium sized screw hooks, 3 small sized screw hooks, a hot glue gun, toothpick, sandpaper, acrylic paint, a paint brush, and water to clean the brushes with. If you want to make this and have a newer cheese grater, it’ll work just as well. You can pick one up at the dollar store and can likely find just about everything else you’ll need for this project there as well.
To start, take the small sized screw hooks and screw them into the holes on the small shredder side of the grater. These will be your necklace and bracelet hooks so place them near the top to ensure that you have enough room for your jewelry to hang. If the screws are a little loose, take the hot glue gun and squeeze a little glue out. Pick up a tiny bit of the melted glue with the end of a tooth pick and dab it around the screw to help hold it in place.
Now that the hooks have been added, it’s time to sand and rough up the entire outside surface of the grater. Take the sand paper and run it all over the grater, making sure to remove any built up rust, then use a soft dry cloth to wipe away any excess dirt, dust, or rust particles. This will help ensure that the paint sticks to the metal surface and won’t chip off later and now it’s ready for a coat of paint.
Use acrylic paint for this and if you don’t have the exact color you want on hand you can mix it up with a blend of other colors, as shown in the video. Brush the paint evenly on the grater and be sure to coat the all the sides and visible parts. Set the grater aside and allow it to completely dry before adding the second coat of paint.
In the meantime, you can make the feet for the jewelry stand. Take the larger screw hooks and dab hot glue on the ends opposite of the threaded part. Attach a pearl bead onto each end and hold them firmly in place until they set. Apply the second coat of paint to the grater and allow it to dry completely before moving onto the final step.
To attach the feet, take the larger screw hooks and apply a generous line of glue along the threaded end, on the side you’ll be attaching it to the grater with. Gently push the glued part of the screw into the inside corner of the grater, making sure that the bead on the outside lines up with the bottom corner. Once the feet are glued on and secure it’s ready for use!
This project is a great re-purposing idea and there are so many ways to customize it to your liking. You can add different sizes and amounts of hooks, switch up the placement of them, go with other types of beads or rhinestones, and choose any shade or mix of colors you prefer. Hopefully it will inspire you, so try it out!
Please Share This With Family and Friends 🙂
He Takes Four Slices Of Tomatoes and Places It In Compost. 10 Days Later He Reveals The UNTHINKABLE!
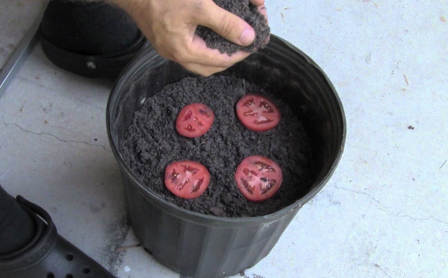
image via – youtube.com
Being a tomato lover, I look forward to “homegrowns” in the summertime. It is a simple pleasure that makes salads tastier, or I just like slicing one up with a little bit of salt, for a healthy delicious snack. I have bought tomato plants and grown them outdoors, but until I watched this great video below, I had no idea that I could grow them with greater ease and less expense.
The tomato growing tip offered by the YouTube channel, The Wannabe Homesteader, is an internet find that I had to share. You will see why it received over 460,000 views, and hundreds of comments, from people who just couldn’t get over this technique and were grateful for this easy tip.
There is nothing worse than cutting into a tomato that turns out to be overripe and inedible. It always kills me when I have to throw one out, but now I know that it can be used to cultivate seedlings, that will mature into my very own tomato plants. The process is so simple, as you will see watching this guy, (who has a really relaxing voice), take you through the steps.
All you will need is: a plastic plant pot, some good rich potting soil, and your overripe tomato cut into slices. He will show you exactly what to do, (which literally takes a few minutes), and within ten to fourteen days about 50-60 seedlings will have sprouted. With a minimal amount of effort you will be picking your very own homegrown tomatoes before you know it!
Please SHARE This Growing Tip With Family and Friends 🙂
These 2 Sisters Pose For A Photo With Minnie Mouse. Now Watch Minnie’s Hand Closely!

Disney World has long been a place for children and adults alike, that creates an otherworldly magical feeling, of insulated wonder from the real world. For young children, who get to meet their favorite Disney characters, they have their first experience of “starstruck celebrity”. For one little girl, Shaylee Mansfield, whom you will meet in the video you are about to watch below, her experience at Disney was truly of a “place where dreams come true”!
Shaylee is a bubbly, vivacious child who at an early age faced the world with a huge burden. She, like her mother, is deaf. Her parents feared that her deafness would cause Shaylee to feel isolated from others, who wouldn’t know how to sign in order to communicate with her. They found an excellent school for her to attend, in which everyone knows sign language; this has afforded Shaylee a feeling of inclusiveness, that has opened up her world, allowing her a normal and happy childhood.
Like most young children, she longed to visit Disney World, but her parents feared that her deafness would preclude her ability to communicate with her heroes, the Disney characters. She and her sister got to pose for a picture with Minnie Mouse, and then the most unexpected thing happened that made Shaylee and her family’s day…Minnie began to sign with her!!
In the video you are about to watch below, you will witness Shaylee’s sheer joy; Minnie’s having learned sign language, allowed Shaylee’s Disney experience to continue to be normalized. As her dad soaked up Shaylee’s interaction, he later explained, “It made her proud of her own language. She made that connection.”
I hope you enjoy this video as much as I did; it is a great example of the unending possibilities of going beyond whatever disabilities we face in life. If we are willing to notice, and remain open to what is positive, life-enhancing doors are there for us to open. Experiencing some joy is always an option, when we undo the shackles of a negative lens.
Please SHARE This With Family and Friends
Pregnant Mom Gives Birth To 3 Black Babies. The Father Sees Them and Immediately Breaks Down In Tears!

image via – youtube.com
For married couples everywhere having children is usually the next step after the wedding. Some couple are able to conceive and have children right away with no problem at all while others try everything and still can’t get pregnant. However in today’s world there are so many options from adoption, to surrogacy, to artificial incemination exc. So even for couple who are having issues there are so many different paths they can take to successfully have children and raise a family.
Rachel and Alan Halbert are featured in today’s beautiful story. This amazing couple was looking to start a family and adopted two wonderful african american babies. One boy and one girl who needed a home, love and a safe place to grow up and mature. The 4 of them were one happy family but this couple didn’t feel like their family was complete just yet. They were told about something called embryo adoption which for them would be the perfect way to go to complete their family.
Knowing that embryos were sitting around frozen, they decided to go this route and Emily would be inceminated so she could experience the wonders of pregnancy and child birth. She had twin embryos implanted and it took. She was finally pregnant and the couple was so happy that they could complete their beautiful and loving family. A little bit after the procedure, she went to her doctor who examined her and noticed something a bit odd.
The doctor asked if they were sure twin embryos were implanted and they told him yes thats what said. A sense of panic took over the room as the couple thought that maybe one of the babies didn’t make it or possibly had genetic mutations. Their doctor assured them that the babies were perfectly fine and healthy however, he had quite the surprise for them. She wasn’t going to give birth to twins, it was going to be triplets!
Somehow 1 out of the 2 embryos split after they were inseminated and this early split led to another baby and the miracle of a new life. After the doctor told the couple instead of freaking out, they were unbelievably grateful, filled with love and super excited to upgrade from twins to triplets. They believed that everything in life happened for a reason and this third child was a beautiful blessing.
When it came time for mama to give birth the doctors didn’t think she would be able to successfully give birth to 3 babies in the standard way so she would need an emergency C-section….
Watch this video below for the full story:
Please SHARE This With Family and Friends


