
This Guy Reveals The Secret Brilliant Trick To Get Your Baby To Fall Asleep In Less Than 60 Seconds!

image via – youtube.com
Whether you are a first time parent, or have had children before and live in dread of the whole process of getting your baby to sleep, the video you are about to watch will change your life! Although some babies have no problem dozing off on their own, many take a long time to adjust to a sleeping schedule.
This can be incredibly stressful for parents, whose sleep is chronically interrupted. Cranky babies and cranky parents are not a good mixture. Sometimes babies have trouble falling asleep, and others have problems staying asleep.
Unending crying and restlessness not only causes exhaustion for everyone, but can interfere with early bonding which is so critical. Believe it or not the answer is here; you are about to watch a literal miracle that calms and soothes baby off to sleep in less than a minute.
This trick works not only for falling asleep, but allows for a deeper, more relaxed sleep so that the baby really gets the rest needed. I can vouch that it has worked with my own children.
Let us know if you have or will try this miracle sleep tip.
Please SHARE this with your friends and family
It Looks Like A Normal Boardwalk But When The Waves Come Crashing In Something Strange Occurs!

image via – youtube.com
In Zadar, Croatia, you can be serenaded by the water as you stroll down the boardwalk. There is an inventive architectural creation which allows notes to be played by the wind of the waves through a tube like structure.
Pipes underlie a set of large marble steps, making the sea organ expansive and majestic. Not quite melodic, the sound is still awe inspiring with its mystical feel and impressive wonder. It is almost as if the Adriatic sea is singing out loud, giving it a playful personality and intriguing communication.
Of course the skill should be credited not only to the artistic water, but to the architect who made the instrument, Nikola Bašić. He built the device as an attempt to beautify the city coast from its rebuild after the Second World War.
The organ provides a break in the monotonous concrete wall that was the sea front repair after devastation. It was opened on April 15, 2005 and is a destination for both tourists and locals to enjoy.
The polyethylene pipes and resonating cavity create a random, yet harmonious, tune. Not the only sea organ to be made, in 2006 it was awarded the European Prize for Urban Public Space, which is a biennial award started in 2000 to recognize public space projects.
Competitors include the Wave Organ in San Francisco, California, and the Blackpool High Tide Organ in Blackpool, United Kingdom.
Please Share This With Family and Friends
She Takes 4 Mugs Of Raw Eggs And Holds Them Over Hot H2O. When She’s Done A Delicious Surprise!
Eggs are one of the most versatile foods to cook with and eat. They are a main ingredient in many recipes and are often cooked by themselves in a variety of different ways. The fact that they are widely available and inexpensive further make them a staple to have on hand in the kitchen.
Plus, they make a great addition to main dishes or as a side accompaniment to a meal. Even people who are not master chefs can easily whip up a batch of scrambled, hard boiled, or fried eggs. However, when it comes to poaching an egg, that falls on the more difficult side of the egg cooking spectrum.
Poaching is a cooking method whereby a food is dropped and simmered in a liquid. Usually the liquid is water, milk, or some type of stock, and it’s an ideal way to cook foods that tend to fall apart when cooked other ways.
That’s why many recipes involving eggs, fish, chicken, and fruits are poached. Mastering the technique can be difficult but if you follow the accompanying tutorial from America’s Test Kitchen you can get it down right and soon you can be poaching 8 eggs simultaneously.
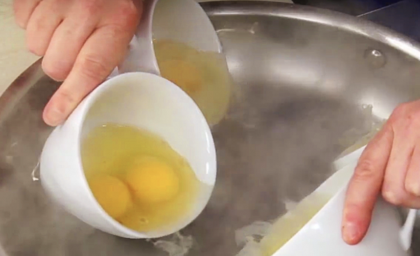
First off, you are going to need water, a skillet with a lid, 2 tablespoons of white vinegar, 1 teaspoon of sea salt, 8 large eggs, and 4 ceramic tea cups. Start by filling up a skillet with water and add in the white vinegar and sea salt.
Place it on the stove over high heat and wait until it boils. In the meantime, prepare the eggs by cracking 2 of them into each one of the tea cups. When the water has reached a steady boil turn off the stove and slide the skillet off of the hot burner.
Grab two tea cups in each hand and gently tilt them while lowering the rims into the water. All of the eggs should flow out at once and thus will cook evenly. Place the lid on the skillet, wait five minutes, and do not move or agitate the pan.
Take the lid off and scoop up each egg individually with a slotted spoon. Place them all on a paper towel lined plate to absorb any excess water and sprinkle with salt and pepper to taste. In the end, you should end up with neatly cooked egg whites that ensconce a still runny, slightly creamy, liquid yolk.
When you dig a fork into them and pierce the whites the yellow yolk will spill out and that’s what the ideal poached egg should look like. Bon Appétit!
Please Share This Recipe With Family and Friends
He Takes A Knife And Slices It Through This Popcorn Bag. But What He Makes Is Brilliant!
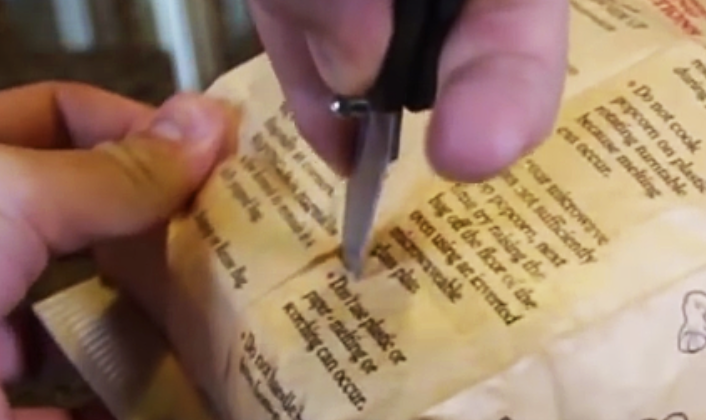
image via – youtube.com
Microwave popcorn is one of the easiest and most convenient snacks to make. All you need to do is stick the bag in the microwave the right side up and press the preset ‘popcorn’ button. A few minutes later it’s done and ready to be scarfed down.
While at first glance it may seem like there is no way in which the process can be improved upon, there are always ways to make things better and microwave popcorn is no exception. Leave it to everybody’s favorite, YouTube’s Crazy Russian Hacker, to figure out the top hacks in which to go about making awesome popcorn.
Firstly, when most people go to reach into a bag of freshly popped popcorn they usually do it from either of the two ends. That means they end up sticking their fingers down into the greasy, buttery, salty, and sometimes cheesy bag to fish around for their snack and end up getting their hands all dirty.
Instead, open the bag from the side by laying it flat and using a knife to cut the entire side off. This makes it easy to reach all the popcorn without coating your entire hand in grease. Another issue is there are always a few kernels that fail to pop in the bag and no one likes biting down on a hard piece.
To easily get rid of them just shake the bag with the heat vent side facing down over a trash can. The unpopped pieces will make their way out of the bag and fall into the garbage where they belong. If you ever find yourself with popcorn kernels but no way to pop them try making your own bag popping system.
Take a brown paper bag and fill the bottom with the kernels, then add in a little pat of butter and whatever seasonings you like, rumple and close the bag and stick it in the microwave. Be careful to watch the bag as it pops and make sure you don’t overcook it.
This way works just as well as the prepackaged versions. This method also works with a glass bowl and a glass or microwave safe plate. Simply combine all the ingredients like above into the bowl and then place the plate over the top so it is covered.
Place it in the microwave, press the popcorn setting and watch it pop. Be careful removing it because the glass will be super heated. Finally, to modify a bag of popcorn you can cut open a slit on one side and pour in seasonings or add more butter to it that way.
Then take a piece of paper tape (not plastic) and cover the slit, microwave, and open from the side to enjoy. Making it this way ensures that the popcorn will be tastier and better suited to whatever preferences you may have.
Get creative and try new taste combinations, who knows, you could end up making the best popcorn of your life!
Please Share These Popcorn Hacks With Family and Friends 🙂
He Takes A Lighter And Holds It Under His Key. The Reason Is Genius But a Little Scary!
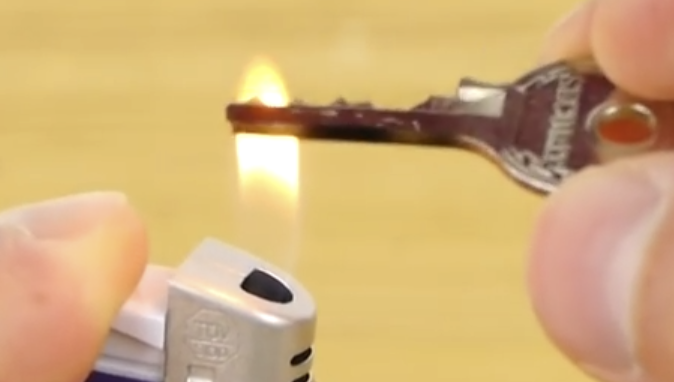
image via – youtube.com
When it comes to keys, they often get misplaced or lost and many seem to disappear when you need them the most. Some of us are vigilant and make copies to have on hand in case we ever lose them, but most people don’t bother to get a spare made.
It’s a minor inconvenience to go to a hardware store and have one made, yet people put it off and eventually forget about getting it done until it’s too late. If you have ever been stuck with a lock and no key to open it, then you know how frustrating and hopeless the situation can be.
The only options you really have are to break the thing open, try and cut the lock, hire an expensive locksmith, or give up on it. At that point, it’s more than likely that the thought “why didn’t I make a stupid spare key for this?” is going through your mind.
Now you can make a spare key in the comfort of your home, without going to the hardware store or spending any money. YouTube’s very own MacGyver, the man with a solution for just about anything, DaveHax, shows how to cobble up a spare in no time at all.
The basic items you will need are the original key, a lighter, a tin can lid, a piece of tape, and scissors. The type of key you’ll end up making is more of an emergency, last resort type of spare to have on hand. Check out the video for an easy to follow tutorial and read on for more information on how to DIY.
Take the original key and place a flame underneath it. A candle or lighter works best for this, and if you hold the key with a pair of pliers you’ll reduce the chances of burning your fingers. Hold the key over the flame until it’s coated black and then place it somewhere safe to cool off.
Meanwhile, take a strip of tape and carefully place it onto the key and then peel it off. This picks up the black soot and makes an exact copy. You can clean off any remaining black left on the original key by rubbing it with a paper towel.
Next, take a lid from a can of food, place it flat on a table, and stick the tape onto the lid. Grab a pair of sharp scissors and carefully cut out the key, making sure to cut it as close and accurately as possible, without cutting yourself on any sharp edges.
When you’re finished you should have a replica key that matches up exactly with the original. To ensure that it works, test out the copy you made on whatever lock it goes to.
You may have to wiggle it gently to make it fit, so be careful no to bend or break it because the key you make is going to be much thinner than the original.
Please Share This Key Trick With Family and Friends
THIS Cow Was So Terrified She Started Crying Until She Realized Where She Was Headed
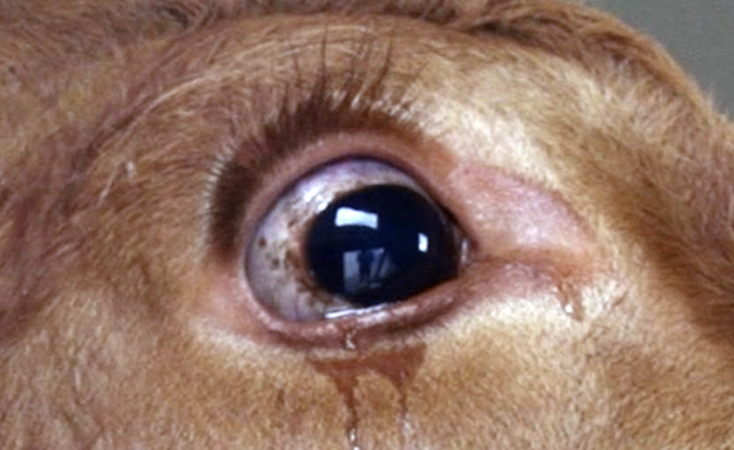
image via – facebook.com
At the Kuhrettung Rhein-Berg Sanctuary in Germany a dairy cow named Emma was acting nervous and not like her usual self. Earlier in the day she had been loaded onto a trailer and driven to her new home at the sanctuary. The dairy farm which she’d called home had recently closed down and she had originally been headed to the slaughter house before her rescuers stepped in.
At first Emma was terrified as her life was suddenly turned upside down. At the start of the video she can be seen crying visible tears of sadness and fear as she was placed in the strange trailer. It’s heartbreaking, but not for long.
Once she arrived at the sanctuary she was released into a spacious pasture filled with green grass, rolling hills, and other cows. She slowly made her way into her new home and before long the other cows came up to greet her. They sniffed and checked each other out and enthusiastically surrounded her.
It’s as if they were all reassuring her that everything was going to be just fine. By the end of the video it looks like Emma has quickly been accepted into her new family and the group goes running off happily into the field.
What started out as a terrifying ordeal ended the best way possible. Thanks to a group of dedicated people Emma was not slaughtered and instead was brought to the Kuhrettung Rhein-Berg Sanctuary in Germany to live. The group rescues dairy cows and retires them to a former farm where they can naturally live out the rest of their days.
Prior to her arrival at the sanctuary, Emma’s life was anything but natural. Cows are known for producing milk and associated dairy products. In order to make that milk a cow must become pregnant and give birth to a calf, whom it will nurse.
However, in the dairy industry young calves are taken away from their mothers shortly after birth so that the milk can instead be collected for human consumption. This separation of mother and child is done early on in an effort to cause minimal stress to both, but it’s also done repeatedly in order to keep cows producing milk.
Cows, like Emma, who end up at the sanctuary are retired, in that they are no longer impregnated and thus do not produce any milk. Fortunately for Emma, she gets to stay with other rescued dairy cows on the farm sanctuary. Her life has changed dramatically for the better.
Now she is able to live alongside other happy cows and can do all the normal, natural things that cows do. It’s a happy ending that she, and others like her, deserve.
Please Share This With Family and Friends


