
This Owl Poops On His Friend. Now Watch The Hysterical Confused Look On His Face When He Realizes.
Every animal excretes waste in one way or another, the most common method being out the rear end. It’s basically a universal law of nature that food goes in one end and comes out somewhere else. While the subject of poo tends to be viewed as impolite to speak about in public discussions, the fact remains that it’s an essential bodily function that we all need and rely on to stay healthy.
Not to mention it just tends to be a hysterical subject matter regardless of the situation. In a world that seems to be getting more and more serious it’s always a good idea to lighten the mood with some old fashioned comedy. Finding humor in peace in the world today is a skill that all people should seek to master!
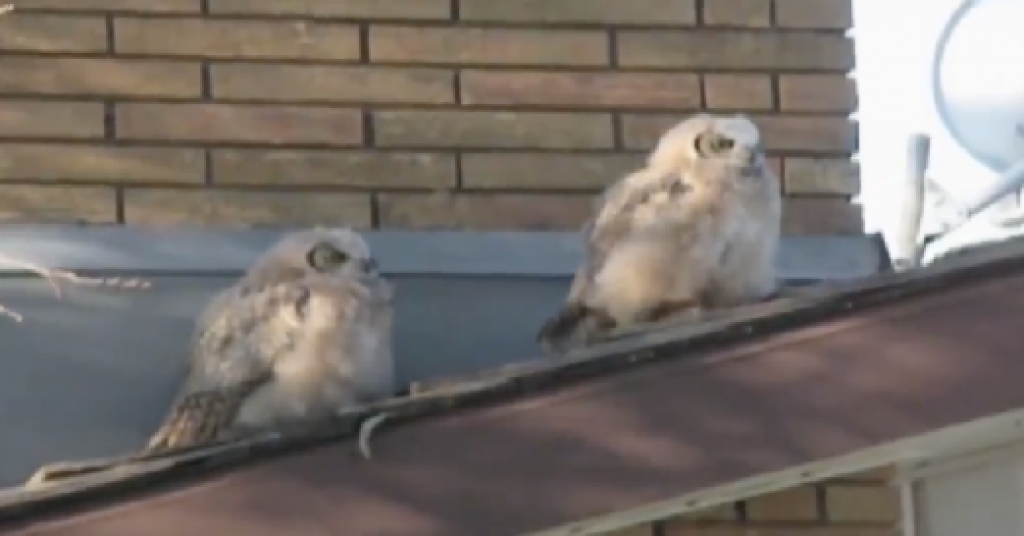
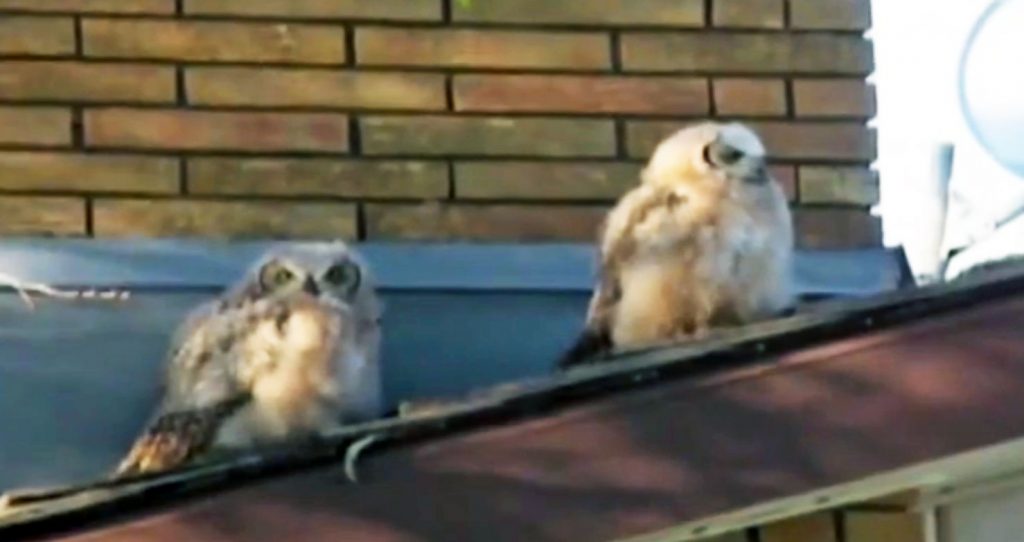
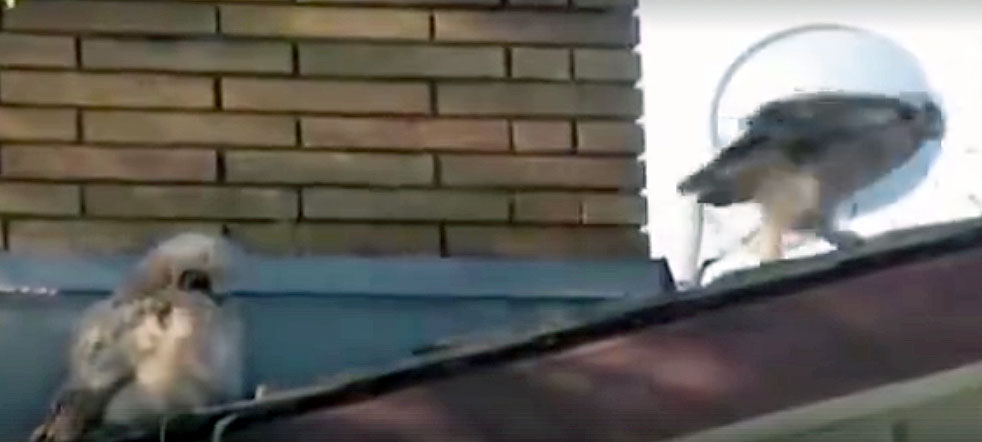
Best selling books have even been written on the topic, like the one titled Everyone Poops, which certainly rings true in this short video clip. As you can see there are two adorable little owls perched up on a rooftop next to one another. They’re just enjoying a moment of relaxation and hanging out together, taking in the sights and sounds around them on what looks like a beautiful day. A nice breeze is blowing the sun is shining and this duo couldn’t look more content with their situation. That is until nature calls and the afternoon takes a sudden turn that neither of them expected!

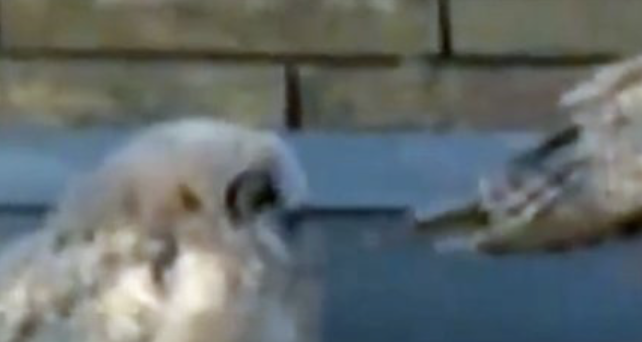
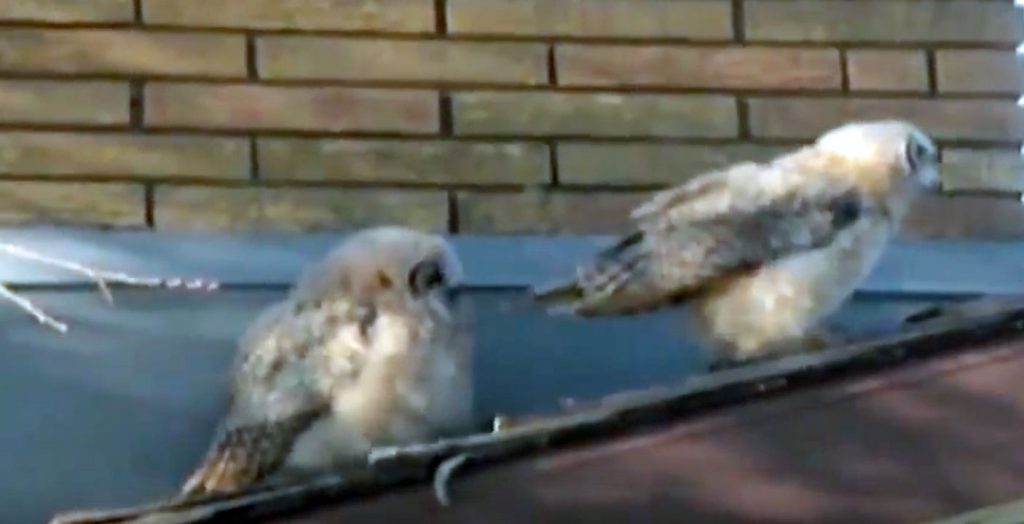
When one of the owls turns to leave he does something completely unexpected… and gross. He does a half spin, lifts his tail feathers, takes a dump all over the roof, then flies off! His buddy is unfortunately perched lower down on the slope and all the poo runs down the the roof, right into him.
When the poor owl notices that he just got pooped on he seems to be in shock, like he cannot believe that just happened. Check out his face and reaction, it’s priceless and makes you feel like you know exactly what’s going through his mind!
Please Share This With Family and Friends 🙂
This Rottweiler’s Human Asks Him To Show His Mean Face. Now Watch The Pup’s Reaction!

Reese the Rottweiler is an incredibly talented dog with a special gift for play acting. While many people will spend their entire lives practicing and perfecting the art, Reese seems to be a natural at it. Even though his owner likely spent a lot of time and dedication teaching him this awesome trick, now that he has it down pat he can do it on command without even thinking. Reese certainly is a natural, not many dogs can do what he does so easily, time and time again.
This short clip of Reese in action is proof of his skills. In the beginning, he looks like any other strong, powerful, handsome male Rottweiler as he sits serenely on a cushion. When his dad asks him to show his teeth, he immediately obliges.
But that’s only the beginning and he’s just getting warmed up. When his dad tells him to “show me your mean face” the real acting begins. Reese curls back his upper lip and bares his sharp white teeth to the hilt. Then he adds in a low, menacing growl and he even does that weird licking thing dogs seem to do when they’re super angry. Personally, I’ve never seen a dog look so mean and angry on cue, at least not like this!
In fact, Reese’s acting is so good that I had to watch the video a few times to convince myself that he isn’t actually angry. The give away doesn’t happen until the very end; up to that point he stays in character perfectly, although his eyes do look pretty calm and gentle throughout.
Either way, to be able to learn this trick and perform it so well, that takes talent and brains. Reese has both in spades and you have got to watch his performance to see just how well he nailed the part. It’s spot-on!
Please Share This Hilarious Video With Family and Friends 🙂
He Starts Cutting This Egg Carton In Half. The Reason Is Surprisingly Brilliant!
I don’t know about you, but I love the guy who does these awesome tutorials. His multitude of life hacks really contain useful ideas, and his presentation just makes me laugh out loud. So, for three new practical hacks, all utilizing egg cartons, sit back and enjoy the video below.
His first ingenious idea he calls The FIRE STARTER. Everyone needs help getting the big logs to catch fire, whether it be in a campfire or at home in a fireplace. For me, either kindling wood or store-bought fire starters are the ‘go-to’. Then comes the crumpled newspaper, dirty hands and all, for added fuel. What if all this could be circumvented?
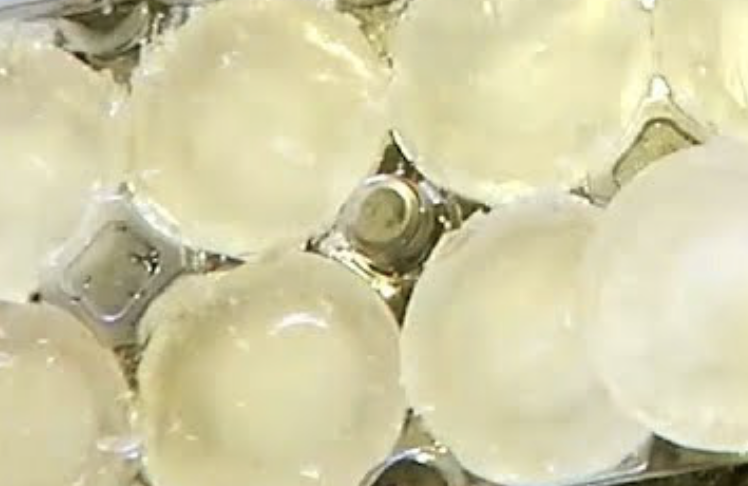
It can! And the CrazyRussianHacker somehow came up with this unusually useful idea, that saves a lot of time. Taking an empty egg carton he stuffs the holes with lint from the dryer, and adds leftover hot wax from a burning candle. Watch what he does next to turn these little gems into fire starters. It’s crazy how well and quickly this works.
Ok, so his next creation which he calls the REFRIGERATOR SPACE-SAVER is truly one of the simplest ideas, that makes you ask yourself why you never thought of this?!! As eggs get used up from the dozen package, he shows you how to reduce it’s size, creating more Frig space, while still storing the remaining eggs. CRAZY SMART!
Last, but not least our CrazyRussianHacker has come up with a really cool MAKE-SHIFT ICE CUBE TRAY. It not only comes in handy when the automatic ice-cube maker freezes up or breaks, but it simply is a way of making cool shaped ice cubes. He does this with empty well-washed egg-carton trays. It’s also a great solution for transporting cubes in a cooler and just tossing the disposable tray.
Sit back and enjoy his tutorial!
Please SHARE These 3 Great Hacks With Family and Friends 🙂
They Found 850 Year Old Seeds And Decided To Plant Them. What Grew Is An Unexpected Surprise!

Every now and then news accounts carry a story about how some plant, insect, and animal is dying out and fast becoming endangered or extinct. There are never any positive stories about how some previously extinct plant has been re-born or brought back into existence, until now.
This seemingly unbelievable tale first began a few years back, in 2008, when a group of archaeologists were conducting a dig on First Nations (Native) land in Wisconsin. During the course of the dig they came across a small clay ball, no larger than a tennis ball, which had been used to store a few handfuls of seeds.
Those seeds were carbon dated back to 850 years ago and identified as “Gete-okosomin,” a type of squash that had not been grown, eaten, or seen by anyone for hundreds of years. The ancient seeds were given to a Native group, who in turn dispersed them to several groups and individuals, all whose goal was to bring them back to fruition.
Eventually the Canadian Mennonite University came to possess some of the heirloom seeds and they gave them to a group of students in Winnipeg, Canada, who were studying and learning about healthy foods. The students planted the seeds in the school garden and tended to them as the plants grew and matured.
By the end of the semester the once extinct squash plants had yielded quite a few orange and yellow streaked, large, tasty squashes. To celebrate their successful growing season and harvest, the students decided to host an end of semester feast. The menu was full of all the healthy foods they had learned about and, above all else, it featured the extremely rare and ancient squash.
Finally, a story about how something that was once extinct was successfully brought back into existence without any modifications or bio-genetic type of alteration. This simple, positive story is just what the world needs this time of year.
As people all over America are about to gather for Thanksgiving and dig into a feast of delicious foods, that likely includes some type of squash, they should remember what the day and coming together is all about. Brian Etkin, the Coordinator of the Garden of Learning in Winnipeg, summed it up best when he said that “this squash is representative of a tribe of a large community and everybody in that community having a place and food being a right of citizenship.” I couldn’t agree more.
Don’t forget to check out the video to see what the 850 year old veggies look like and to learn more about them.
Please Share This Incredible Story With Family and Friends
She Breaks Her Window Blinds Purposely. But What She Creates Is An Unexpected STUNNING Surprise!
Many people love decorating their houses and making it as cozy and comfortable as can be. Interior design is hugely popular and many retail stores are dedicated to the art of interior decorating. They offer everything from rugs, mugs, and vases to the kitchen sink.
However, many of the items found in stores are expensive and only available in limited styles. This is especially true when it comes to window coverings and blinds. While the options run from basic to fancy, the cost increases exponentially as you move up from mini blinds to silk curtains or cedar paneled shades.
If you want gorgeous, custom made window coverings it’s going to cost you, unless you make them yourself! The folks at Better Homes and Gardens made this easy to follow tutorial on how to turn basic mini blinds into beautiful roman shades.
It’s a much more affordable alternative to ordering custom ones and all it requires is a few things that you likely already have on hand. Those items are; white faux wood blinds, thick upholstery fabric, mod podge and a small container for it, a foam brush, pencil, scissors, clothespins, tape measure, and an iron.
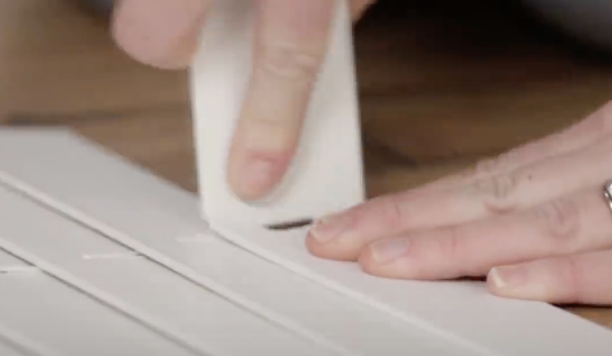
Measure how long the blinds need to be before you begin, then lay them on a flat surface facing down. Extend them out to the desired length and cut away the string that connects all of the slats, aka the ladder string, on both sides. Be very careful to avoid cutting the single, thicker cord that moves the shades up and down, because you’re going to need it.
Each slat is going to be 7 inches apart, to figure out how many slats you’ll need simply take the length of the window in inches and divide it by 7, then snap off any extra slats you don’t need. Next, take the fabric and lay it on a flat surface, place the blinds atop it and evenly space out the remaining slats.
Use the tape measure to ensure that they’re approximately 7 inches apart, this way the blinds will fold up neat and evenly.Measure the fabric so that it extends 2 inches beyond the edge of the slats and 2 inches beyond the top and bottom as well.
If you need to, iron the edges so that the fabric will form a more even hem. Make sure that the blind operation, the part where the strings come out of the top and extend down from, is placed on the back of the fabric. Remove the stopper, located at the end of the top bracket, and use a pair of scissors to cut a notch in the fabric so that it’ll wrap neatly around that end.
Break out the foam brush and use it to apply a coat of mod podge to both the end of the bracket and the fabric. Wrap the piece of glued fabric around the top of the bracket, press it down firmly and secure it with clothespins while it dries.
Moving down each side, apply glue to the end of each slat and the fabric portion that extends out beyond it, then fold the fabric over and onto the end of the slat and secure with more clothespins. At the bottom of the blinds take the fabric and roll it over so that it forms a clean edge. Brush the bottom bar with mod podge and glue the fabric into place, securing it with clothespins.
Allow the glue to dry completely before removing all the clothespins, and at that point they’re ready to be hung. The shades will still be operational like normal mini blinds, but a lot more appealing and better looking. Plus, things won’t get snagged or hung up in them, (like cat paws!). Best of all, they can be customized to your exact tastes at a fraction of the cost of what you’d end up paying retail.
If you want to give your house or just one room an instant upgrade, try this out!
Please Share This Blinds Hack With Family and Friends
Her Clever Trick For Putting On Eyeliner On Perfectly Every time Is Impressive. This Is So Simple.
Being able to create the really dramatic look of winged eyeliner, without the help of a makeup artist, would really be a great achievement. The video you are about to watch below, offers an easy-to-follow tutorial, that will allow you to create the nighttime dramatic eye-popping look!
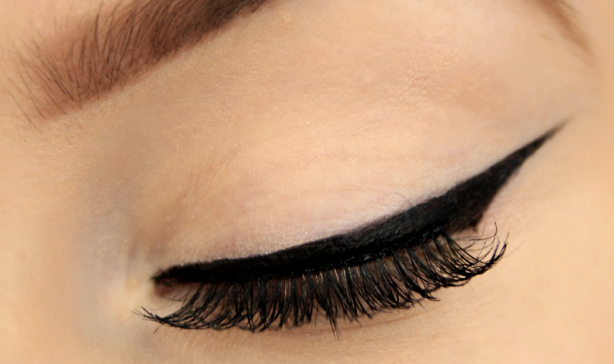
This YouTuber shows you a way to do this in a really sophisticated, tasteful way. She uses a felt-tipped eye makeup pen to place dots in strategic spots along the rim of the eyelid, that will be connected in order to create the outline that will finally be filled in.
Once you have connected the dots to create the outline for the “cat eye”, it’s time to fill in. This can be done with a gel or liquid liner, depending on what you are most comfortable working with. Finally, you can use those pointed q-tips that you have always since in the pharmacy, to clean up any messy edges or do some blending.
Just watch the footage below that takes you through each step, and then try it for yourself. The method is foolproof, and you will find that it is fun to create this look. Let us know if you try it and are happy with the results.
Please SHARE This With Your Family and Friends


