
She Buys A $2 Old Tarnished Cheese Grater But When She Reveals Her Transformation It’s AWESOME.
Do you have any old unused items laying around the house that are begging for a new look? Instead of tossing them out, give your old stuff a new life and recycle things into one of a kind pieces that you actually have a use for. All you need is a little imagination and creativity, plus a few craft supplies, and you can re-purpose just about anything. It also helps to have some ideas and videos with instructions showing you what to do, like this one from the Gibbz DIY channel on YouTube. The video shows how an old, rusty cheese grater that no longer has any use can be transformed into a brand new jewelry holder.
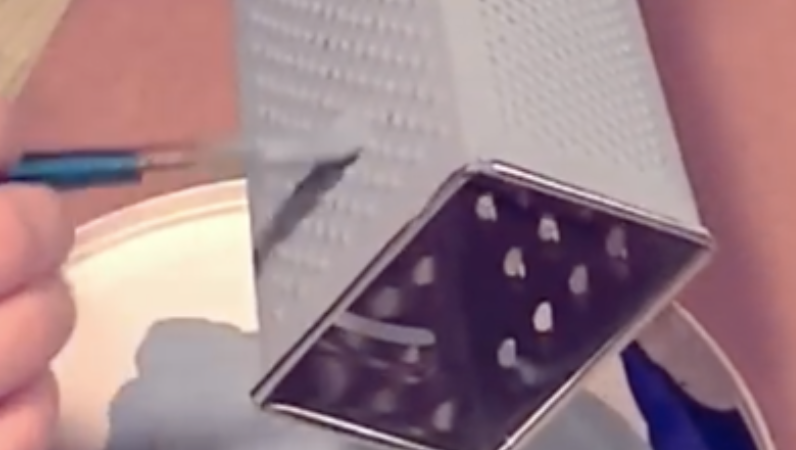
To begin, gather all your supplies and you will need: a box cheese grater, medium sized pearl beads, 4 medium sized screw hooks, 3 small sized screw hooks, a hot glue gun, toothpick, sandpaper, acrylic paint, a paint brush, and water to clean the brushes with. If you want to make this and have a newer cheese grater, it’ll work just as well. You can pick one up at the dollar store and can likely find just about everything else you’ll need for this project there as well.
To start, take the small sized screw hooks and screw them into the holes on the small shredder side of the grater. These will be your necklace and bracelet hooks so place them near the top to ensure that you have enough room for your jewelry to hang. If the screws are a little loose, take the hot glue gun and squeeze a little glue out. Pick up a tiny bit of the melted glue with the end of a tooth pick and dab it around the screw to help hold it in place.
Now that the hooks have been added, it’s time to sand and rough up the entire outside surface of the grater. Take the sand paper and run it all over the grater, making sure to remove any built up rust, then use a soft dry cloth to wipe away any excess dirt, dust, or rust particles. This will help ensure that the paint sticks to the metal surface and won’t chip off later and now it’s ready for a coat of paint. Use acrylic paint for this and if you don’t have the exact color you want on hand you can mix it up with a blend of other colors, as shown in the video. Brush the paint evenly on the grater and be sure to coat the all the sides and visible parts. Set the grater aside and allow it to completely dry before adding the second coat of paint.
In the meantime, you can make the feet for the jewelry stand. Take the larger screw hooks and dab hot glue on the ends opposite of the threaded part. Attach a pearl bead onto each end and hold them firmly in place until they set. Apply the second coat of paint to the grater and allow it to dry completely before moving onto the final step. To attach the feet, take the larger screw hooks and apply a generous line of glue along the threaded end, on the side you’ll be attaching it to the grater with. Gently push the glued part of the screw into the inside corner of the grater, making sure that the bead on the outside lines up with the bottom corner. Once the feet are glued on and secure it’s ready for use!
This project is a great re-purposing idea and there are so many ways to customize it to your liking. You can add different sizes and amounts of hooks, switch up the placement of them, go with other types of beads or rhinestones, and choose any shade or mix of colors you prefer. Hopefully it will inspire you, so try it out!
Please Share This With Family and Friends 🙂
THIS Man Starts Rubbing a Potato All Over His BBQ Grill. The Reason Is Unexpectedly GENIUS!
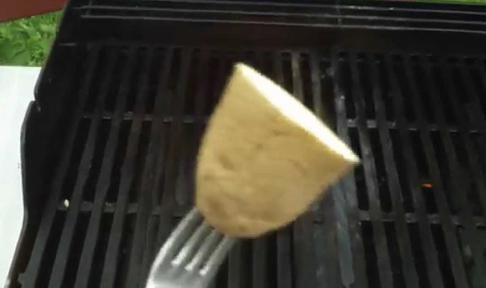
image via – youtube.com
There does come a point in the winter, regardless of how relatively mild an occasional one is, when grilling outside just isn’t inviting. Then those first hints that spring is in the air arrive; the birds are tweeting, and you can actually feel the warmth of the sun…it’s time to clean up the grill!
Food just tastes better on the grill… the smell as it’s cooking makes your mouth water and brings back happy summer memories. I’ve got to say that although we occasionally still go for steaks and burgers, more often than not, we go for the cleaner and healthier choices of chicken, fish and veggies.
There’s just one problem…how to deal with food sticking to the grill without having to constantly be standing there and flipping it? We’ve tried oiling the surface, but more often than not, flames ensue. So, when I came upon the video you are about to watch below, I was intrigued.
There’s a much better way to fire up the grill and make it non-stick, that I’ve never heard of before, so we tried it this past weekend. Rubbing a potato cut in half on the grill’s surface works… The fish didn’t stick and nothing burned!!
The reason why is explained in the footage below.
Please SHARE This Grilling Tip With Family and Friends 🙂
Guy Just Moved Into a New House But He Is Completely Stunned By This Strange Surprise Underneath His Basement!

image via – youtube.com
You never know what you’re going to get when you buy an old house. You can hire experts, appraisers, and inspectors in to evaluate it, but even they can easily miss stuff. When it comes down to it, old houses only reveal their secrets after you move in and start poking around.
One man found this to be true after he bought an old home and noticed something strange. He was on his way down the cellar stairs when he noticed something that just didn’t seem to fit off to the side. Where the wall should have been was a piece of plywood and when he pulled at the corner of the wood it lifted slightly off the wall.
He caught a glimpse of a gap behind it and decided to investigate further. Once he had removed the plywood, he found himself staring into an old room that had been sealed off years ago by the previous owner.
Inside the room were a bunch of boxes and a locked safe. Inside the boxes he found ammunition and live rounds. Box after box he went through and found so much ammunition that it could have easily taken out a small army! Working carefully, he tried to get into the safe but was unable to and so he kept sorting through all the boxes.
That’s when he spotted a grenade laying in the corner of a metal box that was packed with bullets. As the man examined it, he noticed something that made the hair stand up on his arm; there was no pin in the grenade!
Before he ran out of there and called the bomb squad, the man decided to take a closer look. He realized that the powder had been emptied from the grenade via a small hole that had been filed in the bottom. At this point the man needed to know everything that was in the hidden room in case it posed a threat to his life and health. The next box he opened wasn’t nearly exciting, it contained a bunch of pennies and loose change, which was fine by the man.
After going through the rest of the boxes he turned his attention to the safe that he couldn’t crack open. He decided to at least give it one more try and this time around he used heavy duty tools to help him out. When that didn’t work, he had no choice but to cut the door off it. When he finally peered inside, he found a space containing no money, weapons, or jewels, it was empty. All that there was, was a lone spider hanging from its web!
Even though he was disappointed at his lack of an exciting find, the man didn’t let the hidden room and safe go to waste. Instead, he cleaned it all out and converted the space into a storage room for his own stuff. Now it’s more of a wine cellar than a bunker and he keeps beer and liquor down in the cool dark room.
While he’ll never know what the previous owner was really up to with all that ammunition, at the very least he should be glad he didn’t find a dead body down there.
Watch the video below for the full story:
Please SHARE This With Family and Friends
She Gets A Toothbrush And Starts Plucking Out Every Bristle But When She Reveals The End Result? AWESOME!
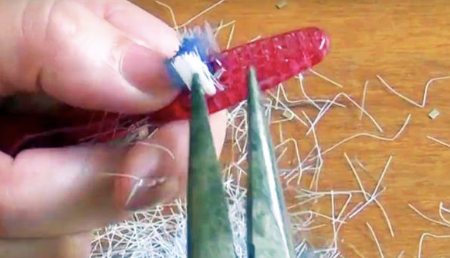
image via – facebook.com
Custom made jewelry can end up costing a pretty penny if you buy it at the store or online. Why not try making some one of a kind pieces at home that cost practically nothing and look just as beautiful as their pricier counterparts! With this tutorial, making your own arm candy can be extremely low cost, easy, and fun to do.
YouTuber Katrina Sherwood posted the creative method that she uses to make unique and inventive plastic bracelets on her blog “Katrinaosity.” The project is a hands-on way to re-use and recycle old plastic toothbrushes into trendy, colorful, 80s style bracelets, so you won’t waste or need to buy anything.
Even if you don’t have any old plastic toothbrushes laying around, they can easily be found at the store for well under five dollars. You can make lots of these and if you mess up it doesn’t matter, just keep going until you make the perfect accessory!
To create your very own bracelets you will need some plastic toothbrushes (the cheap kind work fine), needle nose pliers, a towel and oven mitts, heat resistant tongs, and a pot of hot water. To begin, start by first heating up the pot of water on the stove until it boils.
In the meantime, take the needle nose pliers and use them to rip out all of the bristles from the toothbrush heads. Once the bristles have been completely removed, place one toothbrush at a time in the boiling water for about 10 seconds or so. Using the heat resistant tongs, carefully remove the toothbrush and check to see how pliable it is with a towel or oven mitt protecting your hand.
If it bends enough to be folded into a bracelet shape that will fit around your wrist, it’s done. If it doesn’t, simply place it back in the boiling water for another 10 seconds or so, until it’s flexible enough to bend. The plastic will cool off quickly so you may have to re-boil it a few times until you get the toothbrush to bend into a wearable, desired shape.
These awesome looking, colorful, acrylic type bracelets are so easy to create and turn out beautiful. You can make a bunch and stack them, plus they can be custom made to match any outfit or look you are going for. Check out the video to learn more on how to make them and enjoy!
Please Share This With Family and Friends
4 Things Your Sleeping Positions Reveal About You.

image via – shutterstock.com
Sleeping is an important and major part of everybody’s life. Most people spend around a third of their total life sleeping, based on the idea that we average around 8 hours of sleep every night. Each of us has a favorite position that we like to get into when we crawl into bed. Some people curl up in the fetal position on their sides, while others lay on their backs with their hands resting at their sides.
There are many ways in which we can fall asleep, but overall there’s just a few main positions that we all prefer. Each of these sleep positions has been studied extensively by researchers and sleep specialists who have come to the conclusion that how you sleep reveals insights about your personality.
For example, the most popular way to sleep happens to be in the fetal position; on your side with both legs curled up. Approximately 41% of humans sleep this way according to a survey done by Dr. Chris Idzikowski, a sleep specialist who has written books on the subject.
If you sleep this way it generally means you’re shy, calm, and sensitive on the inside but likely cover this side up with a tougher exterior. Here are what some other sleep positions are associated with: People who sleep straight on their backside with both arms down at the sides have a more reserved, silent type of nature. They have a no-nonsense attitude and are often regimented, preferring to plan things out well in advance.
People who prefer to sleep like a log, on the side with legs straight and arms resting by their sides, are said to be relaxed and have a more laid back type of personality. They are easy to talk to and fun to be around, but may trust others a little too easily which can make them come off as kind of naive.
Those who sleep on their stomach with both hands under the pillow have friendly, welcoming personalities and sunny dispositions. However, they are usually quite sensitive on the inside because they have issues properly dealing with their feelings and emotions.
If you’re a snorer then you may be more aggressive than those who do not. Perhaps it is because of a lack of quality sleep, but people who snore are quick tempered and very easily irritated.
In addition, if you usually sleep in the same position every night and find that you can’t fall asleep comfortably if you’re not in that position, you may be averse to change. That generally means you like and expect things a specific way and when they aren’t you get uncomfortable, tense, and uneasy.
For More Watch The Video Below. What Sleep Position is your go to?
Please SHARE This With Your Family and Friend
A Strange and Simple Smell Test Using This Common Food Can Reveal Alzheimer’s Before Symptoms Begin.
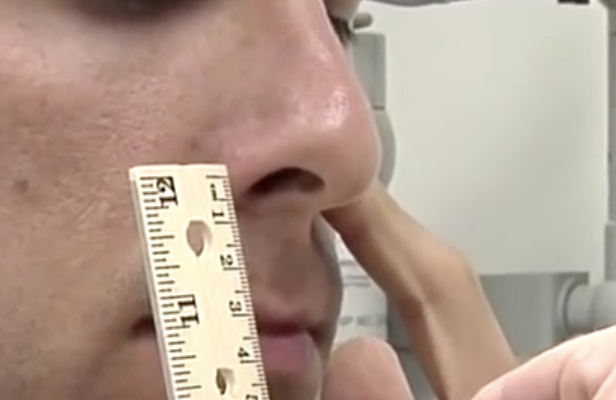
image via – youtube.com
The devastation of a diagnosis of Alzheimer’s disease, is a crushing blow for patients and families alike. Symptoms often go undetected until some really bizarre and often dangerous behavior occurs. As there is no cure as yet for this degenerative brain disease, researchers have been working on finding a means for early diagnosis, that is affordable and will allow treatment to begin to slow down the progression of the disease.
As the website “MNT” has reported, one of the first manifestations of cognitive decline, is a deficiency in sense of smell. Being able to detect smells has a direct link to the first cranial nerve; impairment in this area begins the downward functioning of cognition.
This fact led a group of researchers at the University of Florida Health, led by Jennifer Stamps, to test the acuity of patients’ sense of smell as a potential avenue for early diagnosis of cognitive impairment. Stamps illustrates and explains how they went about doing this, in the video you are about to watch below.
What they discovered was truly a BREAKTHROUGH for EARLY DETECTION of ALZHEIMER’S DISEASE as well as other kinds of DEMENTIA. Stamps explains in the footage below that, “All of the Alzheimer’s patients had a left nostril impairment [while] the right nostril was normal at odor detection [of PEANUT BUTTER]”. While “Alzheimers.net” concurs with the validity of this process for existing Alzheimers, they point out that impaired sense of smell is associated with numerous cognitive impairments.
If you or your family members suspect some cognitive decline and/or a diminished sense of smell, go see a neurologist rather than testing this out at home. Sometimes we imagine deficits that come from fear of
Alzheimers or other forms of dementia, but if these thoughts plague you, it is better to be safe than sorry. Early diagnosis and treatment, should your fears be a reality, will help to ensure a longer quality of life.
Please SHARE This With Family and Friends


