
She Cuts an X Into An Onion And Puts It In The Oven For 30 Min. When She Reveals The Result WOW!

image via – facebook.com
If you have ever enjoyed a tasty blooming onion then you will love this healthy take on that good old deep fried favorite loved by so many! The oven baked recipe is easy to make and prepare, all you need is onions, olive oil, balsamic vinegar, and salt and pepper (optional). The onion will come out of the oven tender, tasty, full of flavor, and makes a beautiful colorful addition to any food it’s served with!
Below is the onion flower recipe! Start by gathering the ingredients; 4 red onions, 3 Tbsp. olive oil, 2 Tbsp. balsamic vinegar, salt and pepper. If you plan on serving this as a side dish with other food on a plate it is best to use smaller sized red onions and if it’s an appetizer then larger ones will do!
Peel the onion and slice off the the bottom root part so that it can be set down flat without rolling around! Carefully cut down the center, but be sure not to cut all the way through, you want to leave about half an inch uncut so that the pieces stay together..
Then cut it in half again so you have 4 pieces, and finally cut each of those in half so you end up with a total of 8 segments, all joined together at the bottom. Place the onions in a bowl, pour the olive oil and balsamic vinegar over, and toss them until they are well coated.
After, transfer all four onions onto a greased baking dish, spreading them out evenly so they have room to cook. Drizzle the remaining oil and vinegar on and sprinkle with salt and pepper. Cover the dish with aluminum foil and bake at 425° for 25-30 min!
When time is up take them out, remove the foil, and then bake uncovered for an additional 10 minutes. When they come out of the oven the onions should be “blooming” and will have opened up in similar fashion to that of a flower’s petals unfolding.
They will be crisp on the outside and tender, juicy, and flavorful on the inside. Onions get sweeter when baked at high temps and these taste just as good as they look! Actually they taste better! 🙂
Let us know how yours turn out! Bon appetite! Enjoy!
Please SHARE This Recipe With Your Family and Friends
THIS Woman Pours Batter Into a Crock Pot! But When She’s Done My Mouth Won’t Stop Watering!
image via – facebook.com
Home-cooked food always seems to taste better than any of the ready-made, store bought variety types, especially when it comes to delicious desserts. The big downside is that baking can be tricky, time consuming and certain recipes are super hard to pull off and get it just right!
It can also take a long time to cook up something delicious and flavorful from scratch. In today’s busy non-stop world, between working all day, getting stuck in traffic or taking care of kids, the motivation is simply not always there for most of us. That is what makes crock pots so convenient and easy. They make cooking homemade meals quick, easy, and almost effortlessly.
All you have to do is toss a bunch of ingredients into the pot, set the timer, and let it cook slowly for a couple hours! You can go about your day and when the food is ready it’ll be warm and waiting, it’s perfect! If you’re looking for a really tasty and filling crock pot dessert recipe this quick and easy banana cake is sure to please all types of palettes.
Plus, you can use up those old bananas laying around and satisfy your sweet tooth at the same time. Unlike many other cakes made from scratch, this one requires little time or effort on your part. Here’s a list of all the ingredients it calls for:
1 ¾ cup plain flour – 2 tablespoons baking powder – ½ teaspoon salt – ¼ teaspoon baking soda – 1/3 cup of butter or margarine – 2/3 cup sugar – 1/2 cup chopped walnuts – 2 eggs, well beaten – 2 tablespoons dark corn syrup – 3 ripe bananas well mashed
Gather all the ingredients and start by beating the two eggs in a bowl. Place the peeled ripe bananas in a separate bowl and mash them up with a fork. In a medium sized bowl sift the flour, salt, baking powder, and baking soda into it.
Mix the sugar and butter together in yet another bowl so that they form a creamy consistency and then stir in the corn syrup, eggs, and bananas. Finally, add the dry ingredients to the wet ingredients and mix them all together very well.
Grease up the inside bowl of the slow cooker with a coating of butter and then place a generous amount of flour inside. Tip it all around so that the flour sticks to the butter and completely coats the inside, this will prevent the cake from sticking and make the removal a lot easier.
Place the banana bread batter into the floured and buttered crock pot and cover it with the lid. Cook times may vary depending on your crock pot.You’ll know it’s done when you stick a toothpick in the middle of the cake and it comes out clean.
If there is cake batter sticking to the pick, continue cooking a little longer or until it comes up clean. Allow the cake to cool before removing, it should slide right out when you turn the cooker upside down but you may have to run a butter knife around the edge to help ease it out.
How you decide to serve the banana cake is all up to you. Cream cheese frosting pairs well with it, as do chopped nuts, a sprinkling of brown sugar, whipped cream, or fresh berries. Really any toppings and additions will work, or none at all because it tastes yummy all on its own!
Pass this delicious banana cake slow cooker recipe along and help add a little more sweetness, and convenience, to the lives of your friends and family. Bon Appétit!
Please Share This Recipe With Family and Friends
Nobody Understood Why Her House Always Smelled So Good. So She Finally Revealed THIS Secret!
image via – youtube.com
For any active family, keeping your house fresh smelling is always a cross to bear and a priority. I have found that deodorizing furniture, pungent sports equipment and stinky pet odors are best tackled by Febreze. However, if you go through the stuff like I do, you will find that the cost mounts up incredibly.
The video you are about to watch below, not only circumvents the cost of endlessly having to buy Febreze, but offers a DIY freshening spray that doesn’t include the residue caused by fabric softener. With three ingredients you will be able to follow this simple, yet incredibly effective odor neutralizer.
The two active ingredients, which get blended with hot water, are BAKING SODA and DOWNY UNSTOPPABLES. The Unstoppables are small scented beads that get added to laundry to boost freshness.
They do so without leaving residue on fabrics or irritating skin for those who are sensitive. A funnel and empty spray bottle will aid in the ease with which you can follow this great home freshening tutorial.
Let us know if you will try this and how it turns out! Watch the video below for a more in depth step by step tutorial!
Please SHARE This With Tip With Your Family and Friends 🙂
THIS Woman Lines Saltines Along A Tray. But THIS Reason Is Unexpectedly GENIUS!
image via – youtube.com
I don’t know about you, but when I want to indulge in a dessert, there is nothing better than the combination of Sweet and Salty. Honestly it does something to the pleasure center in my brain that makes it a crazy addictive combo. Because I love this combination, I was drawn to this video that you are about to watch below.
I love making things from scratch if they are easy to follow, and have a really mouth-watering recipe, like the one presented by Lori Nolan of the Tasty YouTube channel. She and her mom tasted this at a party 20 years ago, and lucked out by getting the recipe. This “cracker candy” is a perfect dessert for any occasion, and people will be amazed at the secret ingredient…SALTINE CRACKERS!
The tutorial below will show you how to make a Caramel Sauce from Brown Sugar and Butter. Watch how she pours this over the Saltines and a final layer of Chocolate Chips and Pecans. Then see how she turns this into a delicious crunchy Bark. Have you ever seen anything look so tasty and delicious in your life?
I’ll be making this at some point this week! Will you be trying out this yum recipe? Let us know how it turns out!
Please SHARE This Delicious Recipe With Family and Friends
He Trims The Top Off These Strawberries Then Hollows Them. But When He Reveals The End Result YUM!
image via – youtube.com
What you are about to watch in the video below, is a truly healthy twist on a favorite dessert…STRAWBERRY SHORTCAKE. It’s definitely one of my faves, so I couldn’t resist sharing this creative alternative…CHEECAKE-STUFFED STRAWBERRIES!!
I decided to make this last night for dessert, before passing this on, and let me tell you, it was absolutely delicious and took less than 20 minutes to make! This is what you will need to make 16-20 cheesecake-stuffed strawberries:
1 pound of fresh, ripe strawberries, rinsed and patted dry – 8 ounces of softened cream cheese – ¾ cup powdered sugar – 1 tsp of pure vanilla – Optional toppings like graham cracker crumbs, crushed nuts, or shaved chocolate
The tutorial is easy to follow; watch how he uses a paring knife to remove the stems, leaves and core from each strawberry, to prep it for the cheesecake filling. The filling gets beaten on a medium setting for 2 minutes, to a light and fluffed consistency; a piping bag will be the handiest way to fill the strawberries before adding your topping of choice.
Chill, serve and ENJOY!
Please SHARE this delightful recipe with your friends and family
She Sculpted This Whole Cake Into A Rose Shape. But When Slices and Reveals The Inside? WOW!
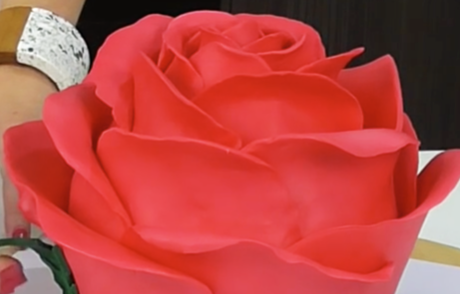
image via – youtube.com
If you want to make an extra special Valentine’s Day treat, or simply a gorgeous looking dessert, you have to try your hand at this rose cake recipe. It’s basically a work of art and even though it looks really hard to make, it can be accomplished.
All you have to do is follow along and watch what Vanessa from Cake Style does in this video tutorial and copy her every step of the way. She also included some really helpful links to the other recipes she used to make the cakes, frosting, and modeling chocolate, so be sure to check them all out.
Before you can begin decorating you’ll need to bake two 6 inch round cakes ahead of time and whip up a batch of sweet butter cream frosting. Add some red food dye to color it pink or red and then make a batch of the modeling chocolate that she uses.
Modeling chocolate is similar to fondant in that it’s easy to mold, shape, and add color to, but it’s made from mainly melted white chocolate and corn syrup which makes it taste a lot better. The main issue with fondant is that it tastes gross, so modeling chocolate is definitely the way to go.
Once you have those three main components you’ll need to gather up a few things including a large spatula, bread knife, metal or plastic scraper, small rolling pin, 3 ¾ inch round cake plate, 12 inch square cake board, cornstarch, small paintbrush, Exacto knife, water or clear alcohol, toothpick, parchment paper, cutting board, turntable, and 2¾, 2½, and 3¾ inch cookie cutters.
It may sound like a lot, but all of these things will make your cake turn out looking like a professional made it. The decorating instructions are best left to Vanessa to explain and this is something you truly have to see in order to understand and replicate it.
She does an excellent job describing everything that you’ll need to know and by the time your done you’ll have a seriously sweet looking rose cake.
Try it out, even if it turns out less than perfect, it’s the thought that counts. Plus, it’ll still be edible!
Please Share This Recipe With Your Family and Friends 🙂


