
She Puts Bread In a Crock Pot Before She Goes To Sleep. When She Gets Up In The Morning YUM!
It’s no secret that a hearty breakfast is the best way to start the day off and yet many people fail to eat after they wake up. To stay as healthy as possible and have energy that lasts throughout the day you have to take the time to eat a good, and preferably home-cooked, breakfast!
For many of us this can be tricky, especially if you’re not a morning person. Whipping up something delicious means waking up earlier than usual and lots of us just don’t have the motivation to make anything first thing in the morning. Not to mention, it often takes a long time to cook up something yummy from scratch. In today’s hectic world it’s easier to reach for a cereal bar than to prepare, cook, eat, and clean up after making breakfast.
However, one simple invention changes all of that, a crock pot! You can make an amazing breakfast with practically no effort at all and you don’t have to wake up early. Slow cookers make life convenient because all you have to do is combine a few ingredients in a pot, set the timer, and allow it to work its magic. After a few hours the food is done, waiting and warm, it’s perfect!
If you’re looking for a slow cooker breakfast idea that is sure to turn out unbelievably delicious, then this French toast recipe will definitely satisfy your taste buds. The accompanying video goes over how to make a batch of the classic brunch staple. It’s basic and easy to follow, plus you can use up any old or slightly stale bread you may have on hand. The following is a complete list of all the ingredients it calls for:
1 loaf of bread 1 teaspoon of vanilla extract
6 eggs 1 teaspoon of cinnamon
2 cups of milk brown sugar
Instructions:
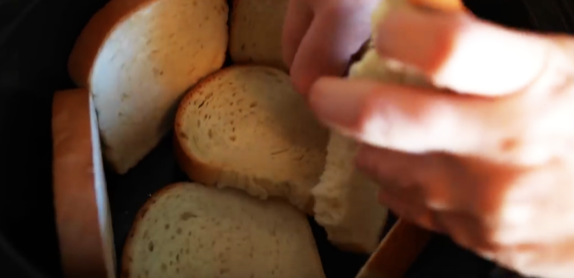
1) Crack the eggs in a bowl and beat lightly with a whisk – 2) Stir in the milk, vanilla, cinnamon, and brown sugar. Mix together well – 3) Lightly mist the inside of the slow cooker with non-stick cooking spray – 4) Layer bread inside the pot until it’s full or you run out. Depending on the type of bread used, you may have to break it apart or cut slices into half pieces – 5) Pour the batter over the bread in the crock pot – 6) Sprinkle a bit more brown sugar and cinnamon on top – 7) Cover and cook on low for about 6 hours. Cook times may vary depending on the size/model crock pot you use, so adjust accordingly
Come morning you’ll wake up with the sweet smell of vanilla, cinnamon, and sugar in the air. This comes out tasting a lot better than it looks, the texture is fluffy and souffle-like, perfect for serving with fresh fruit, a spoonful of cream, or warm syrup. Help make life more convenient for friends and family and share this easy and scrumptious recipe with them, enjoy!
Please SHARE This Recipe With Family and Friends 🙂
She Cuts an X Into An Onion And Puts It In The Oven For 30 Min. When She Reveals The Result WOW!

image via – facebook.com
If you have ever enjoyed a tasty blooming onion then you will love this healthy take on that good old deep fried favorite loved by so many! The oven baked recipe is easy to make and prepare, all you need is onions, olive oil, balsamic vinegar, and salt and pepper (optional). The onion will come out of the oven tender, tasty, full of flavor, and makes a beautiful colorful addition to any food it’s served with!
Below is the onion flower recipe! Start by gathering the ingredients; 4 red onions, 3 Tbsp. olive oil, 2 Tbsp. balsamic vinegar, salt and pepper. If you plan on serving this as a side dish with other food on a plate it is best to use smaller sized red onions and if it’s an appetizer then larger ones will do!
Peel the onion and slice off the the bottom root part so that it can be set down flat without rolling around! Carefully cut down the center, but be sure not to cut all the way through, you want to leave about half an inch uncut so that the pieces stay together..
Then cut it in half again so you have 4 pieces, and finally cut each of those in half so you end up with a total of 8 segments, all joined together at the bottom. Place the onions in a bowl, pour the olive oil and balsamic vinegar over, and toss them until they are well coated.
After, transfer all four onions onto a greased baking dish, spreading them out evenly so they have room to cook. Drizzle the remaining oil and vinegar on and sprinkle with salt and pepper. Cover the dish with aluminum foil and bake at 425° for 25-30 min!
When time is up take them out, remove the foil, and then bake uncovered for an additional 10 minutes. When they come out of the oven the onions should be “blooming” and will have opened up in similar fashion to that of a flower’s petals unfolding.
They will be crisp on the outside and tender, juicy, and flavorful on the inside. Onions get sweeter when baked at high temps and these taste just as good as they look! Actually they taste better! 🙂
Let us know how yours turn out! Bon appetite! Enjoy!
Please SHARE This Recipe With Your Family and Friends
THIS Woman Pours Batter Into a Crock Pot! But When She’s Done My Mouth Won’t Stop Watering!
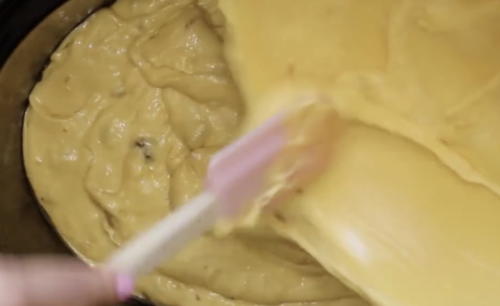
image via – facebook.com
Home-cooked food always seems to taste better than any of the ready-made, store bought variety types, especially when it comes to delicious desserts. The big downside is that baking can be tricky, time consuming and certain recipes are super hard to pull off and get it just right!
It can also take a long time to cook up something delicious and flavorful from scratch. In today’s busy non-stop world, between working all day, getting stuck in traffic or taking care of kids, the motivation is simply not always there for most of us. That is what makes crock pots so convenient and easy. They make cooking homemade meals quick, easy, and almost effortlessly.
All you have to do is toss a bunch of ingredients into the pot, set the timer, and let it cook slowly for a couple hours! You can go about your day and when the food is ready it’ll be warm and waiting, it’s perfect! If you’re looking for a really tasty and filling crock pot dessert recipe this quick and easy banana cake is sure to please all types of palettes.
Plus, you can use up those old bananas laying around and satisfy your sweet tooth at the same time. Unlike many other cakes made from scratch, this one requires little time or effort on your part. Here’s a list of all the ingredients it calls for:
1 ¾ cup plain flour – 2 tablespoons baking powder – ½ teaspoon salt – ¼ teaspoon baking soda – 1/3 cup of butter or margarine – 2/3 cup sugar – 1/2 cup chopped walnuts – 2 eggs, well beaten – 2 tablespoons dark corn syrup – 3 ripe bananas well mashed
Gather all the ingredients and start by beating the two eggs in a bowl. Place the peeled ripe bananas in a separate bowl and mash them up with a fork. In a medium sized bowl sift the flour, salt, baking powder, and baking soda into it.
Mix the sugar and butter together in yet another bowl so that they form a creamy consistency and then stir in the corn syrup, eggs, and bananas. Finally, add the dry ingredients to the wet ingredients and mix them all together very well.
Grease up the inside bowl of the slow cooker with a coating of butter and then place a generous amount of flour inside. Tip it all around so that the flour sticks to the butter and completely coats the inside, this will prevent the cake from sticking and make the removal a lot easier.
Place the banana bread batter into the floured and buttered crock pot and cover it with the lid. Cook times may vary depending on your crock pot.You’ll know it’s done when you stick a toothpick in the middle of the cake and it comes out clean.
If there is cake batter sticking to the pick, continue cooking a little longer or until it comes up clean. Allow the cake to cool before removing, it should slide right out when you turn the cooker upside down but you may have to run a butter knife around the edge to help ease it out.
How you decide to serve the banana cake is all up to you. Cream cheese frosting pairs well with it, as do chopped nuts, a sprinkling of brown sugar, whipped cream, or fresh berries. Really any toppings and additions will work, or none at all because it tastes yummy all on its own!
Pass this delicious banana cake slow cooker recipe along and help add a little more sweetness, and convenience, to the lives of your friends and family. Bon Appétit!
Please Share This Recipe With Family and Friends
She Squirts A Rainbow Mess Into a Mason Jar and Puts It In The Oven. But When She’s Done I’m Drooling!
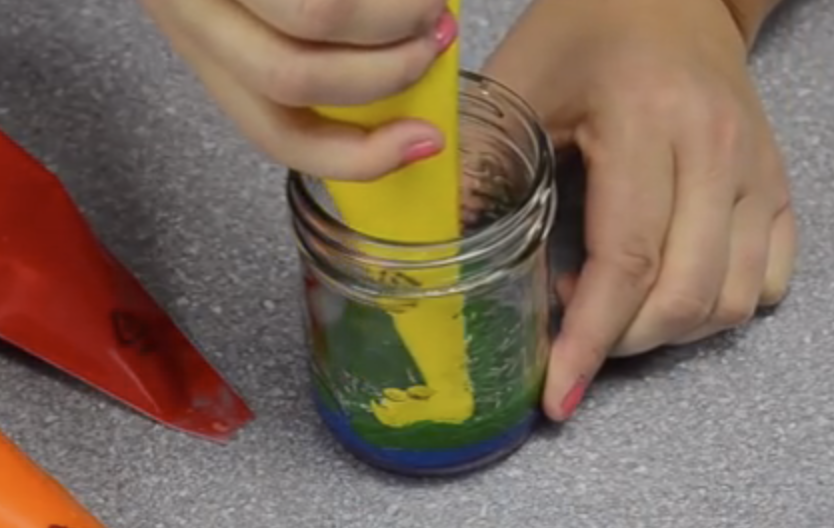
image via – youtube.com
Meet Jen a popular youtube chef from Cookies Cupcakes and Cardio. She is always taking traditional recipes and transforming them into something unique, creative, and incredible. It truly is amazing how a little imagination can take something from being ordinary too extraordinary. People never cease to me amaze me!
In the following video you will learn how to make rainbow cupcakes in a jar. I pretty much love rainbow anything, so cupcakes with rainbows sounds like an awesome idea. Add some sprinkles and let’s make this a party! The best part about the rainbow jar cupcake recipe is that it’s super easy and really fun to make!
The first thing you will need is some canning mason jars. You will also need Cake batter, icing and gel paste. Watch the video below where she goes over each step thoroughly and clearly. Get ready to take a normal cupcake and make them amazingly epic! Enjoy and let us know how your rainbow jar cupcakes came out!
I’m totally making them this weekend!
Please Share With Family and Friends 🙂
He Flattens Bread And Adds a Special Ingredient. When He’s Done An Unexpected Tasty Surprise!
Start your day off right with the help of this strawberry french toast roll-ups recipe. Just reading the name of this treat is enough to make taste buds start watering! These are perfect for breakfast or brunch and are easier to whip up than you’d imagine.
In the accompanying video, YouTube channel Crouton Crackerjacks demonstrates how to properly prepare the dish, so check it out. The recipe instructions and a list of ingredients are below, so make sure you have everything in stock and make these sweet, heavenly creations sooner rather than later!
List of ingredients: 12 slices white sandwich bread, ½ pint fresh strawberries, 4 ounces of softened cream cheese, ¼ cup powdered sugar, 2 large eggs, 2 Tbsp granulated sugar (divided), ¼ tsp cinnamon
Start by rinsing and coring the strawberries, cut them into bite size pieces, and place in a bowl. Add 1 tsp of sugar to the berries and toss them around so they are lightly coated. Place the cream cheese in a separate bowl, add the powdered sugar, and mix together.
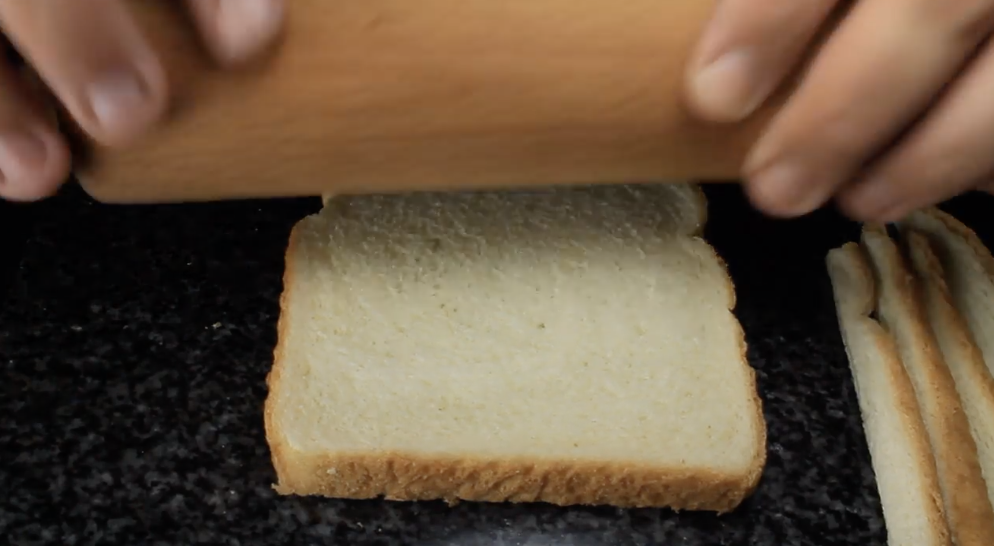
Take a rolling pin and flatten the bread slices, trim off any crust, and spread a teaspoon of the cream cheese mixture on one edge of the bread. Place a spoonful of berries on top then carefully roll up the bread around the berries and cream cheese so that it’s nice and tight.
Take another bowl and whisk together the eggs, milk, 2 teaspoons of sugar, and the cinnamon. Preheat a griddle or nonstick pan over medium heat and add a little oil or butter to it. Coat the rolls in the egg batter and then place each one seam side down to cook. When they start to brown roll them over just a bit, and continue to cook until all the sides are browned.
Once they’re done and off the heat you may dust the rolls with powdered sugar and top the plate off with more fresh berries or fruit. This recipe makes 12 delicious strawberry and cream cheese filled french roll ups. Try making some this weekend and be sure to share this recipe with friends and family, so that everyone can enjoy a fancy and tasty breakfast!
Please Share This Recipe With Family and Friends
She Wraps Raw Dough Around A Tinfoil Cone. The End Result Is An Unexpected Yummy Surprise!
Fact: Food served in a cone naturally tastes better than food not served in a cone. That statement has been independently verified by myself and is based off of the following information. Ice cream is great by itself, but when it’s packed into a crispy, airy, convenient to hold cone it becomes amazing.
There is something about the mechanics of food being ensconced in an edible cone-shaped holder that kicks the eating experience up a notch. Perhaps it’s because you have to work a little harder for a bite, so it’s more rewarding. Or maybe because the food is being presented to us in a visually different way our taste buds are tricked into thinking it tastes better.
Whatever the reason may be, there simply isn’t enough food being served in cones these days. The recipe below will show you how to make homemade bread cones that are perfect for stuffing with salads, rices, chicken, steak, or whatever other savory foods you like. The video also shows how to whip up some tasty Moroccan chicken salad, as well as the bread cones, so check it out and pass it on!
If you have the following ingredients on hand then you can make this recipe right away, they include: 1 lb of white flour, 1 tbsp of sugar, 1 tsp of salt, 3 tbsp of olive oil, 1 tbsp of instant yeast, 2 tbsp of dried milk, about a cup and a half of warm milk, tinfoil.
Combine all the dry ingredients in a large bowl, then pour in the oil and milk a little at a time, while mixing it as you go until a soft dough forms. Dust a large working surface with flour and knead the dough on it until it becomes soft and elastic. Take a bowl, coat it in oil, place the dough inside of it, cover with a kitchen towel, and allow the dough to rise for 30 minutes.
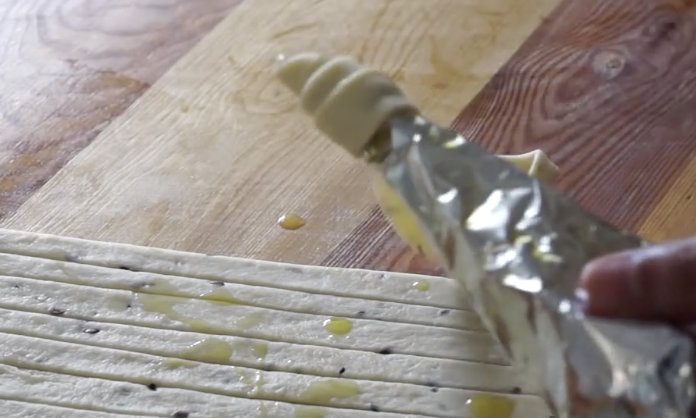
Take an approximately 10 inch square piece of tinfoil and fold it in half, then fold that in half again, so you end up making a smaller square. Pinch it into a cone shape by holding one corner of the foil square while folding another inwards, then pinch the top to make sure it holds the shape.
When the dough has risen release any air in it by gently punching it down. Divide it into 4 pieces and roll each one into ¼ inch thick rectangles, then cut the dough into half inch strips. Take the tinfoil cones and brush them with oil to prevent the dough from sticking, and wrap the strips around the cones like how you see in the video.
Place them on a baking sheet, brush with an egg wash, and bake at 375 degrees for 20-30 minutes or until they turn a golden brown. Let them completely cool before placing them in cups (to hold them steady) and fill them up with whatever you’d like!
Please Share This Recipe With Family and Friends


